Fix Reverse Osmosis Constantly Draining

A reverse osmosis system that constantly drains wastes 4–5 gallons of water for every gallon it purifies, and worse, it never actually stops running. In a properly functioning unit, drainage occurs only during the active fill cycle, typically 3–4 hours after you use the faucet. Once the storage tank is full, no water should flow to the drain. Continuous drainage signals a mechanical failure, not normal operation.
Most constant drain problems trace back to failed valves, incorrect pressure, or hidden leaks downstream. The good news is that each cause is testable with basic tools and a logical sequence. This guide walks you through pressure checks, valve isolation tests, and repair procedures so you can stop the waste and restore efficient operation.
Confirm the System Is Actually Constantly Draining
Before replacing parts, verify that the drainage you see isn’t just a normal fill cycle.
Check the Storage Tank First
A full RO storage tank feels heavy, around 20 lbs, while an empty one weighs about 5 lbs. If the tank feels light, the system may simply be refilling after heavy use.
- Wait 4+ hours after the last water draw, then check for drainage.
- Listen near the drain line for a constant gurgling sound.
- Disconnect the drain line and place it in a bucket. If water accumulates over 30 minutes with no faucet use, the system is failing to shut off.
If drainage stops within a few hours, the system is working as designed. If it persists, proceed to diagnostic testing.
Test Your Feed Water Pressure
Incorrect feed pressure prevents the automatic shut-off valve from closing, causing endless drainage.
Pressure Requirements
- Too low (below 40–45 PSI): The tank cannot build enough back-pressure to trigger shut-off. The system never “knows” the tank is full.
- Too high (above 80–120 PSI): Excessive pressure overwhelms the valve’s ability to balance, preventing closure.
Measure Pressure Without a Gauge
- Turn off all household water appliances.
- Grab a 1-liter measuring jug and stopwatch.
- Open a nearby cold tap and collect flow for exactly 6 seconds.
- Multiply the liters collected by 10 to get liters per minute (LPM).
Interpretation:
– Below 10 LPM → Low pressure (install a booster pump)
– 10–15 LPM → Acceptable
– Above 15 LPM → Good or high (consider a pressure reducing valve)
Diagnose the Automatic Shut-Off Valve
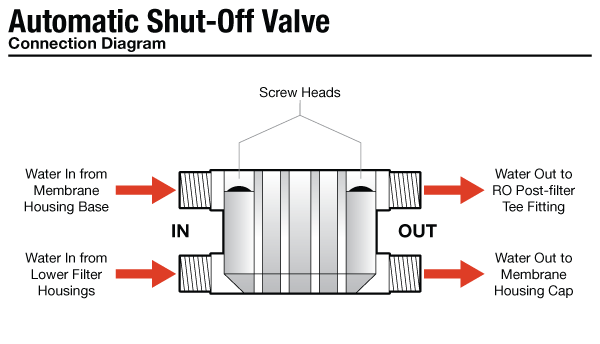
The ASO valve stops feed water when tank pressure reaches roughly two-thirds of incoming pressure. When it fails, water keeps flowing and draining.
Identify the ASO Valve
Look for a white, golf-ball-sized component with four tubes: inlet from pre-filters, outlet to membrane, tank line, and drain line.
Run the Tank Valve Test
This test reveals whether the ASO responds to tank pressure.
- Confirm the tank is full (feels heavy).
- Open the RO faucet briefly to confirm flow, then close it.
- Disconnect the drain line and watch for flow.
- Close the tank valve.
- Wait 5–10 minutes.
Results:
– Drain stops → ASO valve is working. The issue may be tank pressure or the check valve.
– Drain continues → ASO valve is faulty and needs replacement.
Pro Tip: Even a functional ASO valve should be replaced every 3–5 years. Internal diaphragms degrade and cause intermittent failures.
Test the Check Valve
A failed check valve allows pressurized tank water to backflow into the membrane housing and out the drain.
How the Check Valve Works
This small spring-loaded valve sits on the purified water outlet of the membrane. It prevents reverse flow. When it fails, tank water pushes backward through the membrane and exits via the drain line, tricking the system into thinking the tank is empty.
Conduct the Feed Cut-Off Test
This isolates the check valve from the ASO.
- With the drain line disconnected, ensure the tank is full.
- Turn off the feed water supply.
- Open the tank valve fully.
- Watch the drain line.
Results:
– No flow → Check valve is intact.
– Water still drains → Tank water is flowing backward. The check valve is faulty.
Critical Note: Many check valves are integrated into elbow fittings. If the internal spring is bent or dislodged, replace the entire fitting, not just the spring.
Inspect the Flow Restrictor

The flow restrictor maintains back-pressure on the membrane, enabling purification and proper shut-off.
Common Problems
- Missing: If removed during cleaning and not reinstalled, water rushes to the drain too fast.
- Clogged: Debris blocks flow and alters pressure dynamics.
- Cracked or dislodged: Allows unregulated flow that mimics constant drainage.
How to Check It
The restrictor is typically an inline cylinder in the drain line or a small color-coded insert inside a drain elbow.
- Shut off feed water and relieve pressure.
- Remove the restrictor carefully.
- Inspect for cracks, debris, or deformation.
- Flush with clean water or replace if damaged.
Warning: Never operate the RO system without a flow restrictor. It is essential for membrane performance and system longevity.
Check Storage Tank Pressure

Improper tank pressure disrupts the ASO valve’s ability to shut off.
Ideal Settings
- Empty tank: 7 PSI (some models allow 7–10 PSI)
- Full tank: Pressure rises naturally with water volume
If pressure is too low, the tank overfills before triggering shut-off. If the bladder is ruptured, pressure spikes erratically.
Re-pressurize the Tank
- Turn off feed water and open the RO faucet.
- Close the tank valve and disconnect the tank.
- Drain all water until the tank feels light.
- Locate the Schrader valve (like a tire valve) under the blue cap.
- Use a bicycle pump or air compressor to add air.
- Measure with a digital pressure gauge and adjust to 7 PSI.
- Reconnect and restart the system.
Expert Note: Check tank pressure annually. A sudden drop indicates a ruptured bladder, which requires full tank replacement.
Rule Out External Water Demand
A hidden leak in an icemaker line can keep the RO system running nonstop.
Common Culprit: Refrigerator Icemaker
Many RO systems supply purified water to refrigerators. A slow leak or faulty valve in the icemaker line creates constant demand.
How to Test
- Shut off the RO feed water.
- Locate the tubing going to the refrigerator.
- Disconnect it at the RO system or fridge.
- Cap or plug the RO end.
- Turn feed water back on and observe the drain.
Result:
– Drain stops → Problem is in the icemaker line.
– Drain continues → Issue is within the RO unit.
Inspect the icemaker valve and tubing for leaks and replace any damaged components.
Replace Faulty Valves Step-by-Step
When testing confirms a failed ASO or check valve, replacement is straightforward.
Replace the Automatic Shut-Off Valve
- Shut off feed water and open the faucet to relieve pressure.
- Close the tank valve.
- Label or photograph tube connections on the ASO valve.
- Disconnect one tube at a time using a tube cutter for clean ends.
- Install the new ASO valve, matching port orientation.
- Insert tubes fully (about 1/2 inch) and secure with locking clips.
Pro Tip: Replace the check valve at the same time. These parts often fail together due to similar wear patterns.
Replace the Check Valve
- Locate it on the product water line exiting the membrane housing.
- Note the flow direction arrow.
- Cut or disconnect the tubing on both sides.
- Install the new valve, ensuring correct flow direction.
- Reconnect and secure tubing.
Use OEM Parts: Aftermarket valves may not meet pressure specifications and fail prematurely.
Prevent Future Drainage Issues
Prevention beats repair. Stick to a maintenance schedule to avoid recurring problems.
Recommended Maintenance Schedule
| Component | Frequency | Purpose |
|---|---|---|
| Sediment and carbon filters | Every 6–12 months | Maintain pressure and protect membrane |
| RO membrane | Every 2–3 years | Ensure efficiency and proper flow |
| ASO and check valves | Inspect annually; replace as needed | Critical for shut-off function |
| Tank pressure | Check yearly | Maintain 7 PSI when empty |
| System sanitization | Annually | Prevent biofouling and bacterial growth |
Visual Inspection Tips
- Look under the sink monthly for dampness, corrosion, or dripping.
- Listen for unusual hissing or gurgling sounds.
- Monitor fill time. Consistently long cycles signal early failure.
When to Call a Professional
While most constant drain issues are DIY-fixable, some situations require expert help.
Seek Professional Help If:
- Fittings aren’t standard quick-connects and require cutting or soldering.
- Parts fail repeatedly after replacement, which could indicate hard water, sediment overload, or chemical contamination.
- You suspect incorrect installation, such as a missing restrictor or reversed valves.
- The system is under warranty, since unauthorized repairs may void coverage.
A licensed plumber or RO specialist can perform water testing, pressure audits, and full system diagnostics.
Final Fix Checklist
Before concluding, run through this checklist:
- Feed pressure is between 40–80 PSI
- Storage tank is full and pressurized to 7 PSI when empty
- ASO valve shuts off when the tank valve is closed
- No backflow when feed water is cut off (check valve test)
- Flow restrictor is present and unobstructed
- No external leaks (such as icemaker line)
- All tubing is securely connected and undamaged
Frequently Asked Questions About Reverse Osmosis Constant Drain Issues
Why does my RO system keep draining water even when no one is using it?
Continuous drainage means the system has failed to reach its shut-off equilibrium. The most common causes are a faulty automatic shut-off valve, a failed check valve allowing backflow, incorrect feed water pressure, or an external leak such as an icemaker line drawing water continuously.
How do I know if my RO system’s pressure is too low?
Use the bucket-and-stopwatch method: collect water from a nearby cold tap for 6 seconds, measure the liters, and multiply by 10. If the result is below 10 LPM, your pressure is likely too low. Below 40–45 PSI, the system cannot build enough back-pressure to trigger the shut-off valve.
What happens if I run my reverse osmosis system without a flow restrictor?
Without a flow restrictor, water rushes to the drain too quickly and cannot build the back-pressure needed to force water through the membrane. This prevents proper purification and prevents the system from reaching the pressure equilibrium needed to shut off, resulting in constant drainage.
How often should I replace the automatic shut-off and check valves?
Inspect these valves annually and replace them every 3–5 years as preventive maintenance, or immediately if testing confirms a failure. Because they often fail together due to similar wear patterns, many technicians recommend replacing both at the same time.
Can a refrigerator icemaker cause my RO system to drain constantly?
Yes. If your RO system supplies an icemaker and the line or valve leaks, it creates a constant low-level demand. The system never reaches a full-tank state, so it keeps running and draining. Disconnect the icemaker line to test whether the drainage stops.
How long should a normal RO fill cycle take?
A complete fill cycle from empty typically takes 3–4 hours, depending on tank size, membrane capacity, and feed pressure. If the system runs significantly longer without shutting off, it likely has a valve or pressure issue that needs diagnosis.
Key Takeaways for Fixing a Constantly Draining Reverse Osmosis System
A reverse osmosis system constantly drains due to preventable mechanical failures, not design flaws. Start by verifying feed pressure (40–80 PSI) and tank pressure (7 PSI when empty), then isolate the fault using the tank valve test and feed cut-off test. These two tests will identify whether the ASO valve, check valve, or both need replacement. Most fixes take under an hour and cost less than $30 in parts.
Stay proactive with annual maintenance: check tank pressure, inspect valves, and replace filters on schedule. Your RO system will deliver clean water without the endless drip.