Reverse Osmosis System Leaking: Quick Fixes

You turn on the faucet expecting clean, filtered water, only to find a puddle forming under your sink. A leaking reverse osmosis system can cause water damage, mold growth, and even compromise your drinking water quality. If your RO system is leaking, you’re facing one of the most common problems homeowners encounter with this equipment.
The good news is that most leaks stem from predictable issues like loose connections, worn O-rings, clogged drain lines, or improper installation. With the right approach, you can diagnose and repair the problem without calling a plumber. This guide walks you through every possible leak source in your reverse osmosis system and provides clear, actionable fixes. You’ll also learn prevention strategies and recognize when professional help is necessary.
Shut Off Water and Depressurize Immediately
When you spot a leak, every minute counts to prevent water damage under your sink and beyond.
Shut off the main water supply by locating the valve on the cold water line feeding your RO system. Turn the handle until it sits perpendicular to the pipe, which stops all water flow completely. Next, close the storage tank valve to isolate pressure from the system. Without this step, residual pressure can keep forcing water through the leak point.
Then depressurize the system by opening the RO faucet and letting it run until no more water comes out. This removes internal pressure and makes inspection safer. If your system has a leak detection sensor, verify it’s placed on the floor beneath the unit, not attached to the system itself. Sensors mounted on the RO head often miss slow leaks until significant pooling occurs.
After containment, look for visual signs like pooled water, damp cabinetry, or warped wood. Listen for hissing or gurgling sounds near connections. Also note any performance changes such as low water pressure or constant dripping from the faucet when idle.
Locate the Leak Source Fast
Most RO leaks come from five key areas. Check each systematically to pinpoint the problem.
Start with filter housings, the most common leak points. Look for drips around the base of the canisters or moisture between stacked filters. If water drips from the third housing onto the second, the issue likely involves upper filter seals.
Next, inspect the faucet base. A wet spot here usually means internal gasket failure or a clogged drain line. Test by running the system. If water backs up or trickles after shutting off, the faucet is involved.
Check all pipe connections. Follow the tubing lines (red, black, yellow, blue) and look for wetness at joints. Push-fit fittings should be fully seated, and missing safety clips are a frequent culprit.
Examine the feed water adapter where the RO taps into your cold water line. Leaks here often stem from loose threads or damaged seals.
Finally, trace the drain line (black tube). If it’s wet near the air gap or sink connection, a clog could be forcing water backward through the system.
Use a dry paper towel to wipe connections and watch where moisture reappears. This helps isolate the exact failure point.
Fix Filter Housing Leaks

Filter housings fail most often due to O-ring issues or improper tightening.
Start by turning off the water and depressurizing the system. Remove the suspect housing by turning it counterclockwise. Place a bowl underneath to catch spillage.
Once off, inspect the O-ring on the filter’s top cap. It must be present, intact, and facing upward. If missing or flipped, it won’t seal properly. Also check the housing bowl for cracks. Translucent models let you see damage without removal.
If the O-ring is in place but leaking, apply a thin layer of food-grade silicone to both the O-ring and the housing groove. This boosts sealing and prolongs rubber life.
Reinstall the filter, hand-tighten the housing, then give it exactly one full turn with a wrench. This “one-turn rule” ensures proper compression without cracking the housing. Over-tightening damages O-rings and housings alike.
Replace Cracked or Worn Housings
If the housing bowl is cracked, replacement is the only fix. Even hairline fractures worsen under pressure.
Remove the old housing and match it to a new one by size and thread type. Install the new unit with a fresh O-ring and silicone lubrication. Reassemble using the one-turn tightening method.
For systems over 10 years old, consider replacing all housings. Rubber seals degrade over time, and older plastic becomes brittle.
Repair RO Faucet Leaks
A dripping faucet isn’t always a faucet problem. It’s often a symptom of a blocked drain line.
First, depressurize the system and close the faucet. Remove the handle and trim to access the internal components. Look for worn washers or gaskets. Replace them with exact matches from a hardware store or the manufacturer.
If the leak happens only during or after the purge cycle, the real issue is likely drain line clogging.
Clear a Clogged Drain Line
The black drain tube connects to your sink’s air gap or disposal. Over time, food debris clogs the vent, creating backpressure that forces wastewater out through the faucet.
To clear it:
- Locate the air gap cap on your sink.
- Remove it and insert a bamboo skewer into the vent hole. Push deep to break up gunk.
- For stubborn clogs, use compressed air. Insert the nozzle 1–2 inches into the vent.
- Seal the open end with a glove or rag.
- Blast short bursts of air to dislodge debris.
After clearing, run a full purge cycle. Water should drain freely without backup at the faucet.
Prevent Future Clogs
Install a filter screen in the drain line to catch debris. If you use a garbage disposal, run it regularly to prevent buildup that can migrate into the RO drain.
Clean the air gap every 6–12 months as part of routine maintenance.
Secure Pipe and Fitting Connections

Loose tubing is a silent leak starter. Even a slightly dislodged line can drip for weeks before detection.
Fix Push-Fit Fittings
Most RO systems use push-in connectors with safety clips.
To secure:
- Remove the locking clip.
- Push the tubing in fully until it stops.
- Gently pull back on the tube to engage the internal collet.
- Reinsert the clip completely.
If the tube won’t seat, check for kinks or cracks. Replace damaged sections with new RO tubing (usually 1/4 inch).
Seal Threaded Fittings
For threaded adapters like the feed water connection, use Teflon tape.
- Unscrew the fitting.
- Wrap 3–5 layers of Teflon tape clockwise around the male threads.
- Reconnect and tighten gently. Over-tightening strips threads.
Ensure tubing colors are correctly routed:
- Red: Water inlet
- Black: Drain line
- Yellow: Tank connection
- Blue: Faucet line
Miswiring won’t cause leaks directly but can lead to pressure issues that stress seals.
Fix Feed Water Adapter Leaks
Leakage at the cold water connection means the adapter isn’t sealed.
Turn off the main supply and disconnect the adapter from the water line. Inspect the threads for damage. If they’re stripped, replace the entire adapter.
Apply fresh Teflon tape to the threads, wrap clockwise, then reconnect. Hand-tighten, then give it a quarter-turn with a wrench. Avoid cross-threading by starting slowly to align properly.
Once reconnected, slowly turn the water back on and watch for drips. If it leaks, disassemble and add more tape.
Diagnose Leak Stop Valve Issues
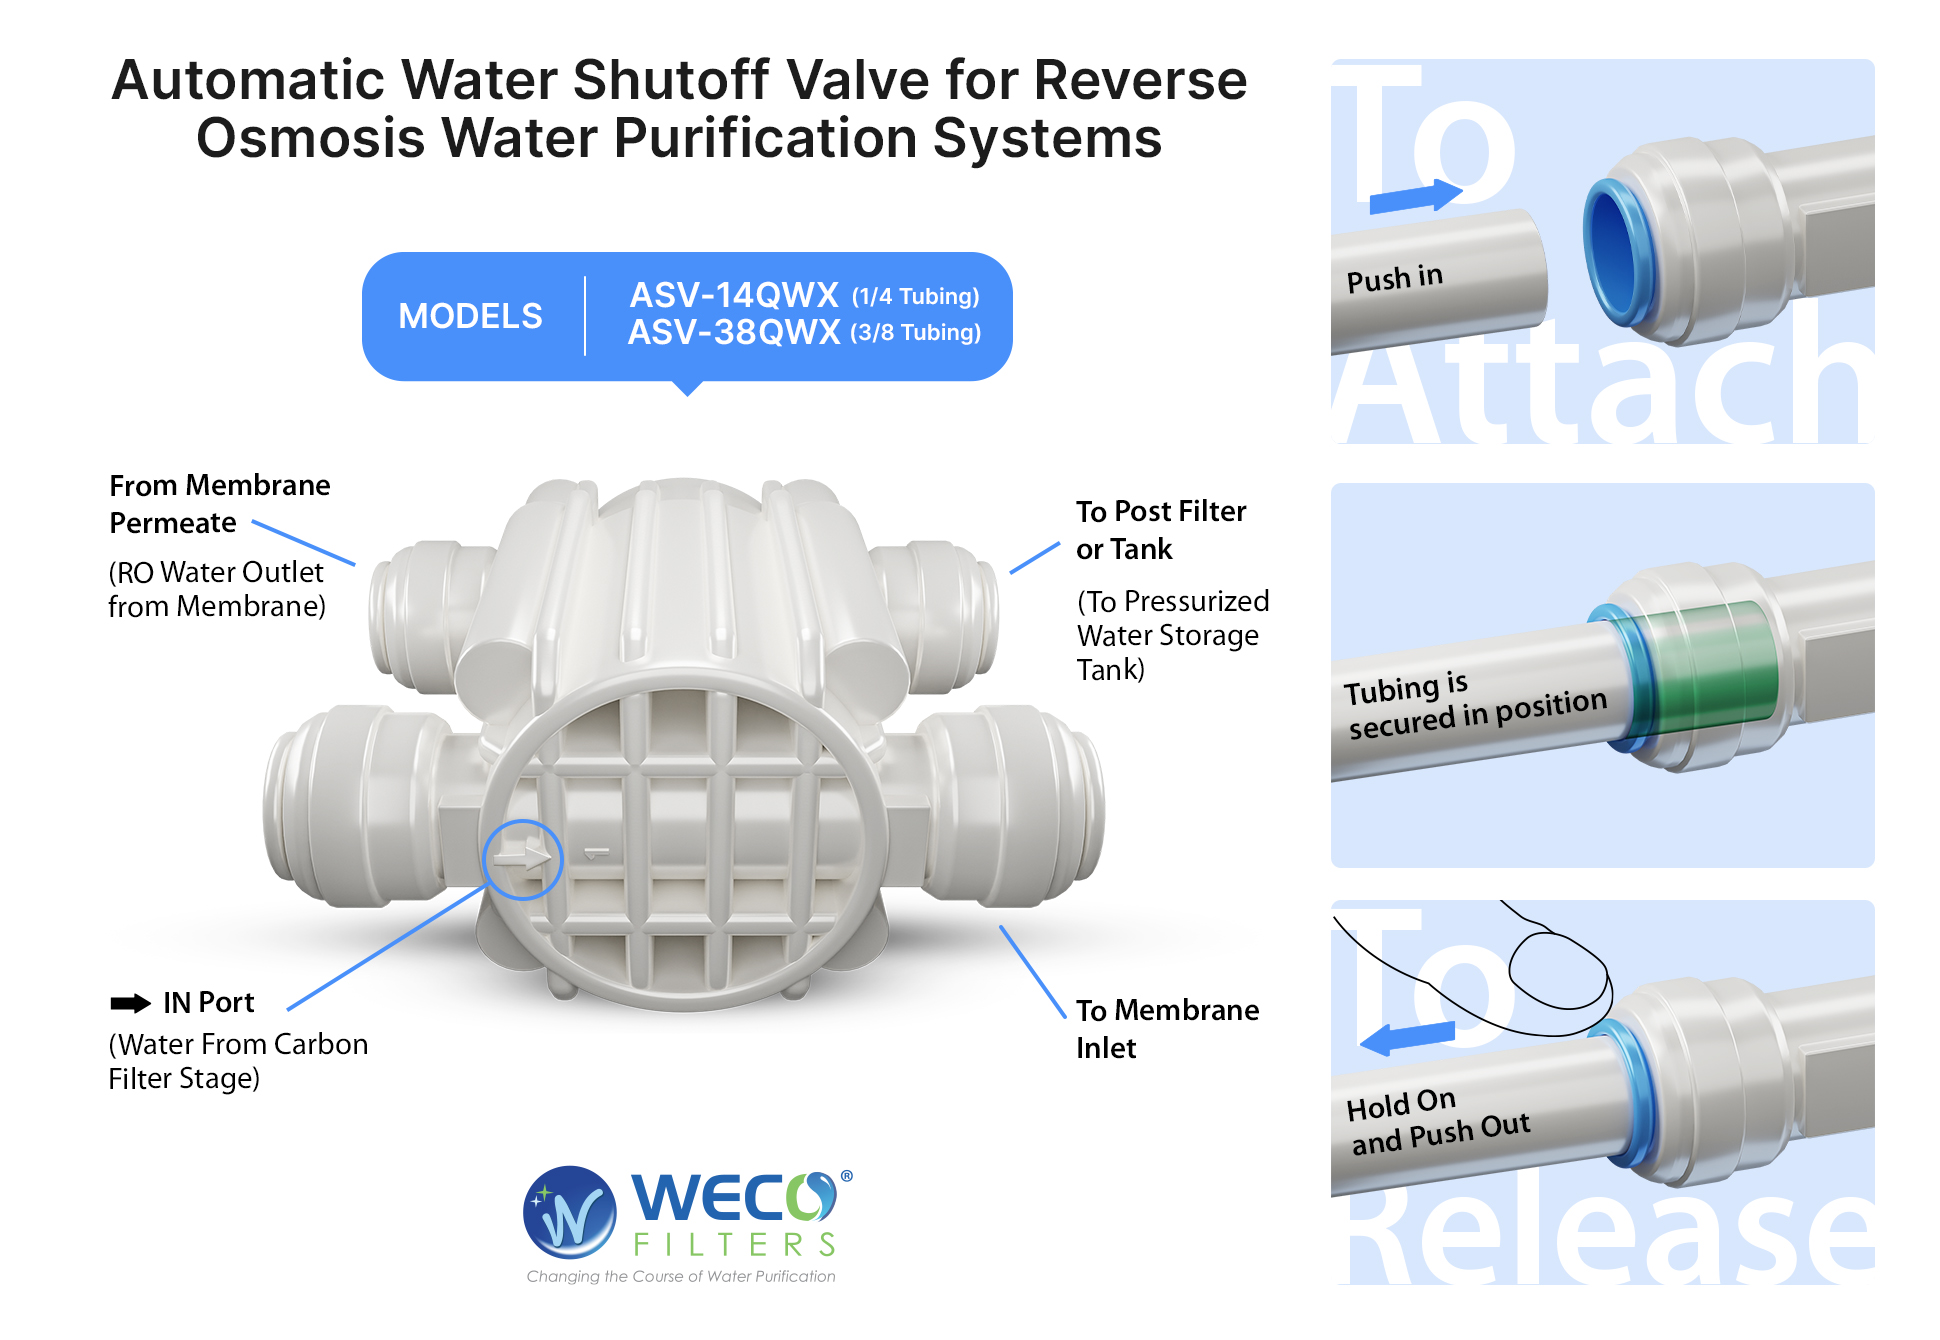
Some RO systems have an automatic shut-off valve that stops water if a leak is detected.
If this valve is leaking, the problem is usually improper tubing insertion.
Check that the tube is pushed fully into the valve. Remove the safety clip, push the tube in until it stops, pull back slightly to lock, then reinsert the clip.
If the internal sealing puck is damaged, replace the entire valve. These valves are not repairable.
Prevent Leaks With Smart Maintenance
Most leaks are preventable with regular care.
Follow this maintenance schedule:
- Every 6–12 months: Replace pre-filters (sediment and carbon). Black filters mean they’re saturated.
- Every 1–2 years: Swap the RO membrane and post-filter. A failing membrane increases pressure stress.
- At every filter change: Inspect and lubricate O-rings with food-grade silicone.
- Every 6 months: Clean the drain line with a skewer or compressed air.
- Annually: Sanitize the entire system to prevent biofilm and clogs.
Set monthly reminders to check for moisture under the sink. Listen for hissing or gurgling as early warning signs.
Stop Leaks Before They Start
Upgrade your system with leak prevention tech.
Install an automatic shut-off valve that cuts water if a leak is detected. Pair it with a floor-mounted water sensor, never on the unit itself. These sensors trigger alarms or shut-off systems within seconds of contact with water.
Consider a drain line filter screen to catch debris before it enters the air gap. This is especially useful if you run a garbage disposal.
For homes with high water pressure (over 80 psi), install a pressure regulator. Excess pressure strains seals and can burst lines.
When to Call a Pro
Some issues go beyond DIY fixes.
Call a professional if:
- Leaks persist after replacing O-rings and tightening connections.
- You notice fluctuating water pressure, which may indicate pump or valve failure.
- Water tastes salty or off, suggesting a ruptured membrane.
- There’s constant gurgling or banging not fixed by clearing the drain.
- You’ve had a flood or water quality event and want a full system check.
- You’re upgrading the system by adding stages or connecting to ice makers.
Professionals can test pressure, inspect internal components, and ensure compliance with warranty terms.
Frequently Asked Questions About Reverse Osmosis Leaks
Where do most RO system leaks occur?
Most leaks occur at filter housings, pipe connections, the faucet base, and the feed water adapter. Filter housing failures are particularly common due to O-ring issues and improper tightening.
Can high water pressure cause my RO system to leak?
Yes. Water pressure above 80 psi can burst lines, damage fittings, and compromise seals. Installing a pressure regulator protects your system from this risk.
How often should I replace O-rings in my RO system?
Inspect O-rings at every filter change (every 6–12 months). Replace them if they show cracks, flattening, or signs of wear. Lubricate with food-grade silicone during each inspection.
Why does my RO faucet leak during the purge cycle?
A leak during the purge cycle usually indicates a clogged drain line. Food debris blocks the air gap vent, creating backpressure that forces water out through the faucet instead of down the drain.
How long do reverse osmosis systems typically last?
Most residential RO systems last approximately 10 years before significant component degradation occurs. Regular maintenance and timely replacement of filters and seals extend system life.
Should I place my leak sensor on the RO unit or on the floor?
Always place leak sensors on the floor beneath the system. Sensors mounted on the unit itself often miss slow leaks until significant water pooling has already occurred.
Key Takeaways for Fixing Your Leaking Reverse Osmosis System
A leaking reverse osmosis system is usually fixable with basic tools and a methodical approach. Start with emergency shutdown by cutting the water supply and depressurizing the lines. Then locate the source by checking filter housings, faucet assemblies, pipe connections, the feed water adapter, and the drain line systematically.
Apply the right repair for each issue. Reseat O-rings with food-grade silicone, clear drain line clogs with a skewer or compressed air, and tighten fittings using the one-turn rule for housings and Teflon tape for threaded connections. Regular maintenance every 6–12 months prevents most leaks, while smart upgrades like floor sensors and automatic shut-off valves add long-term protection.
If leaks persist after these steps, or if you notice pressure fluctuations or water quality changes, call a professional. With consistent care, your RO system will deliver clean, safe water for years to come.