How to Clean Primo Water Dispenser

Is your Primo water dispenser producing water that tastes off, smells strange, or flows slower than usual? Many users overlook a simple fix: regular cleaning. Over time, mineral buildup, biofilm, and bacteria accumulate inside the reservoirs and spouts, compromising both water quality and machine performance. The good news? Learning how to clean a Primo water dispenser takes less than an hour and requires only common household supplies.
Following Primo’s recommended every-three-month cleaning schedule helps prevent scale, maintain fresh-tasting water, and extend your unit’s lifespan. In this guide, you’ll learn a complete method using vinegar or bleach, including often-missed steps like draining from the rear valve and cleaning the spout interior for full sanitation.
Recommended Cleaning Frequency
Every 3 Months Is Essential
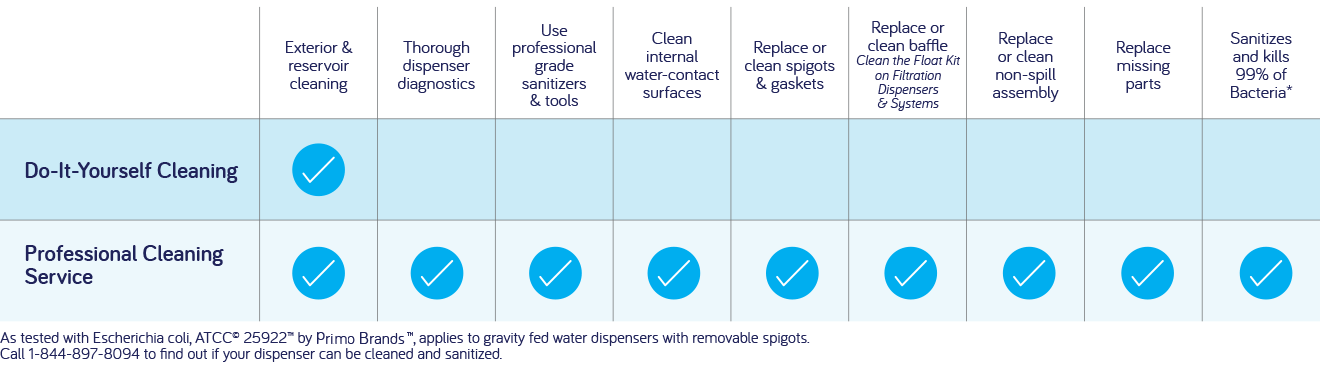
Primo advises cleaning your dispenser every three months to prevent contamination and mechanical issues. This routine removes mineral deposits from hard water, eliminates microbial growth, and keeps your water tasting fresh. Skipping cleanings leads to scale buildup that clogs internal valves and reduces heating and cooling efficiency.
When to Clean Sooner
Don’t wait for the 90-day mark if you notice:
- Bad taste or odor in the water
- Slow flow from hot or cold taps
- High usage in offices or large households
- No cleaning in over 6 months
These are clear signs your unit needs immediate attention. Dispensers in multi-user environments or homes with pets should be cleaned more frequently due to increased contamination risk from hands, cups, and airborne particles.
Gather Required Supplies
Choose Your Cleaning Agent
You only need one of these two options:
White Vinegar (Recommended)
- 2 cups distilled white vinegar
- Non-toxic, safe for drinking systems, effective on minerals and microbes
- Leaves no chemical aftertaste
Bleach (If Vinegar Unavailable)
- 2 tablespoons regular bleach
- Stronger disinfectant but requires thorough rinsing
- Never mix with vinegar, as dangerous fumes will result
Tools and Accessories
- Empty 5-gallon water bottle (for mixing solution)
- 2-gallon bucket (to catch drain water)
- Clean pitcher or jug (for rinse water)
- Measuring cup (for accuracy)
- Phillips head screwdriver (to access rear drain)
- 4 Q-tips (for spout cleaning)
- Mild dish soap (such as Dawn Platinum)
- Mr. Clean Eraser (for tough exterior stains)
- Clean cloths or paper towels
Optional: Pre-measured water dispenser cleaning kits simplify the process, especially for beginners.
Power Down and Prepare Unit
Turn Off and Unplug
Start by switching all energy-saving switches to OFF, then unplug the dispenser from the wall. This prevents electrical hazards during cleaning and ensures safety when accessing internal components.
Remove Water Source
- Top-loading model: Lift off the 5-gallon bottle.
- Bottom-loading model: Disconnect the water line per your model’s instructions before moving.
Move for Access
Pull the unit away from the wall to reach the rear drain valve, a critical but often ignored step. Without this access, sludge and scale trapped at the bottom won’t be fully removed.
Drain Remaining Water
Empty Front Taps First
Dispense any leftover water from both hot and cold taps into a bucket until flow stops. This clears the main reservoirs and prevents mixing old water with your cleaning solution.
Why This Matters
Skipping this step reduces cleaning effectiveness. Leftover water dilutes your vinegar or bleach mix, weakening its ability to sanitize and dissolve scale.
Mix and Load Cleaning Solution
Create the Cleaning Mix
In the empty 5-gallon bottle:
- Add 2 cups white vinegar (or 2 tablespoons bleach)
- Fill with 2 gallons of hot tap water
- Cap and gently shake to mix
Hot water improves cleaning power by helping the solution dissolve mineral deposits faster.
Install and Activate
Place the bottle on a top-loader or reconnect it to a bottom-loader. Plug the unit back in and turn switches ON. Let the solution fill the internal reservoirs until bubbling stops, which means the system is fully charged.
Soak for Maximum Effect
Let It Sit for 10 Minutes
Turn switches OFF and unplug the unit. Allow the solution to soak for 10 minutes. This dwell time breaks down biofilm, kills bacteria, and loosens scale inside reservoirs and lines.
Why Soaking Works
Mineral deposits and microbial films need time to dissolve. Rushing this step leaves residue behind, leading to recurring taste issues even after cleaning.
Drain From Rear Valve
Access the Drain Point
Unplug the unit. On the back, find the plastic cap covering the drain valve. Use a Phillips screwdriver to remove it, then pull out the red silicone plug underneath.
Deep Drain Into Bucket
Place a 2-gallon bucket under the valve. Open the plug and let all remaining solution and sludge drain out. Expect to see white particles or cloudy water, which is mineral buildup and biofilm being flushed out.
Re-Seal Properly
Once drained, reinsert the red plug and replace the plastic cap. Hand-tighten only. Do not use a drill or excessive force, as this can strip the threads and cause leaks.
Rinse Thoroughly
Flush With Clean Water
Refill the 5-gallon bottle with 2 gallons of hot tap water (no cleaning agents). Attach it to the dispenser, plug in, and turn switches ON. Dispense water from both taps until the bottle is empty.
Repeat if Needed
If you detect a vinegar or bleach smell, repeat the rinse cycle. For heavy buildup, drain from the rear valve again with clean water to ensure no residue remains in the lowest parts of the system.
Clean Exterior Components
Remove and Wash Drip Tray
Slide out the drip tray beneath the spouts. Wash it with warm soapy water. For sticky residue or stains, use Dawn Platinum Power Wash or a Mr. Clean Eraser.
Check for Pet Hair
Pet owners should inspect for hair caught in the tray mechanism. Remove debris before washing to prevent clogs.
Sanitize the Spouts

Wipe Interior With Q-Tips
Use 4 clean Q-tips to swab the inside of both hot and cold spouts. This removes biofilm and residue that rinsing alone can’t reach.
Why This Step Is Critical
Spouts are high-touch zones. Bacteria from cups and hands accumulate here, directly affecting water hygiene. Most users skip this, leading to persistent taste problems.
Wipe Down Surfaces
Clean All Exterior Areas
Wipe the entire unit with a damp cloth, focusing on:
- Around the spouts
- The drip tray area
- Any spots where sugary drinks or flavored beverages may have spilled
Avoid abrasive pads that can scratch plastic surfaces.
Restore and Test
Return to Position
Slide the dispenser back against the wall, ensuring the power cord isn’t pinched.
Install Fresh Water Bottle
Place a new 5-gallon Primo bottle on top (or reconnect bottom-load line). Plug in and turn energy-saving switches ON.
Verify Operation
Dispense a small amount of water from both taps. Check for:
- Normal flow rate
- No vinegar or bleach odor
- Clear, fresh-tasting water
If taste is off, run another rinse cycle.
Prevent Future Buildup
Use Filtered Water
If you have hard water, consider installing a water softener or reverse osmosis (RO) system upstream. This reduces mineral content and cuts down on scale formation, meaning fewer deep cleanings.
Maintain a Schedule
Set a calendar reminder every 90 days. Consistent cleaning prevents issues before they start.
Troubleshoot Common Issues
No Lights or Power After Cleaning
Ensure the unit is plugged in and the outlet is working. Check that energy-saving switches are turned ON.
Slow Water Flow
The likely cause is mineral clog. Repeat cleaning with vinegar and confirm the rear valve was drained. Consider more frequent cleanings if water hardness is high.
Cloudy or Off-Tasting Water
This indicates incomplete rinsing. Run 2 to 3 additional rinse cycles. Always check for lingering vinegar or bleach smell before use.
Stuck Drain Plug
Use the Phillips screwdriver gently and do not force it. If stuck, apply slight twisting pressure by hand. Never use power tools, as this can damage the valve.
Model-Specific Tips
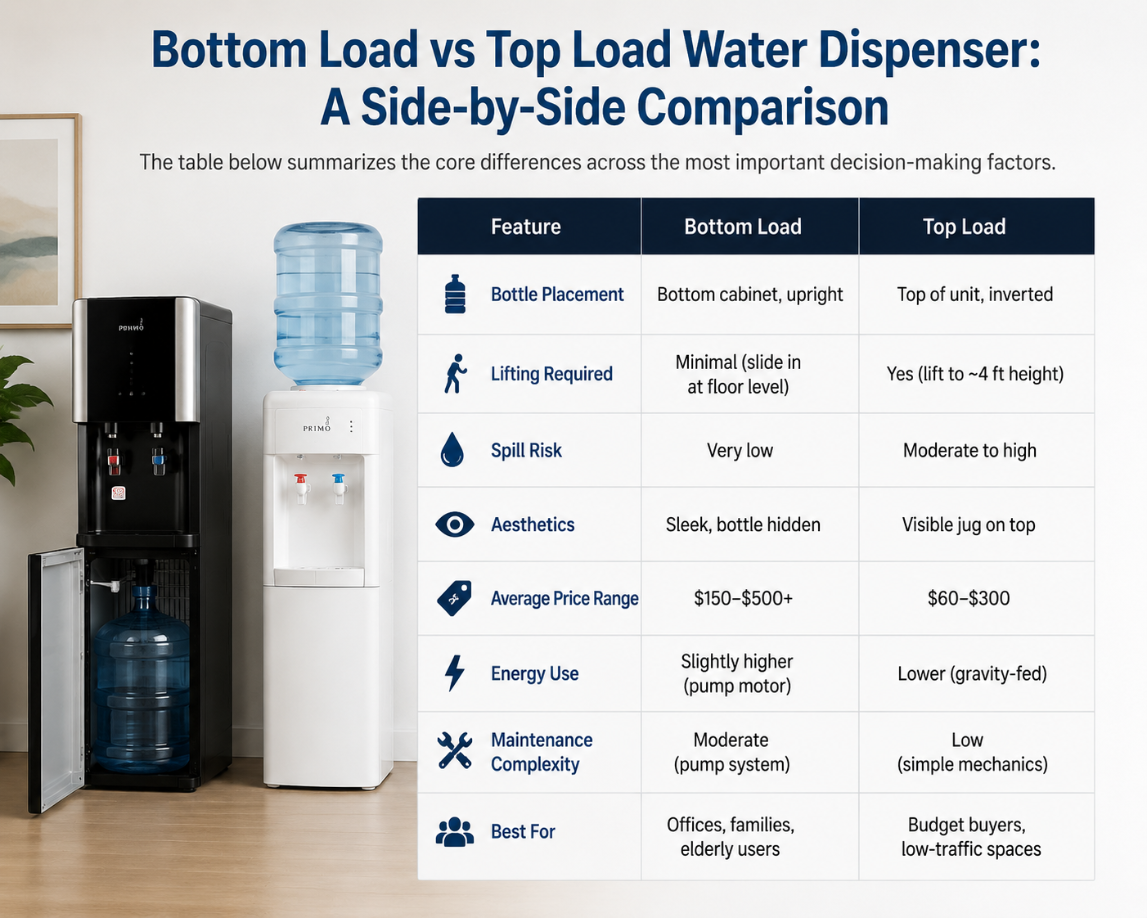
Bottom-Load Dispensers
- Disconnect the water line quickly before moving
- Internal cleaning process is identical to top-load models
- Ensure quick-connect fittings are dry before reattachment
Top-Load Dispensers
- Most common model, follow standard steps
- Use pre-measured cleaning kits for error-free mixing
Why Vinegar Beats Bleach
Safety and Taste
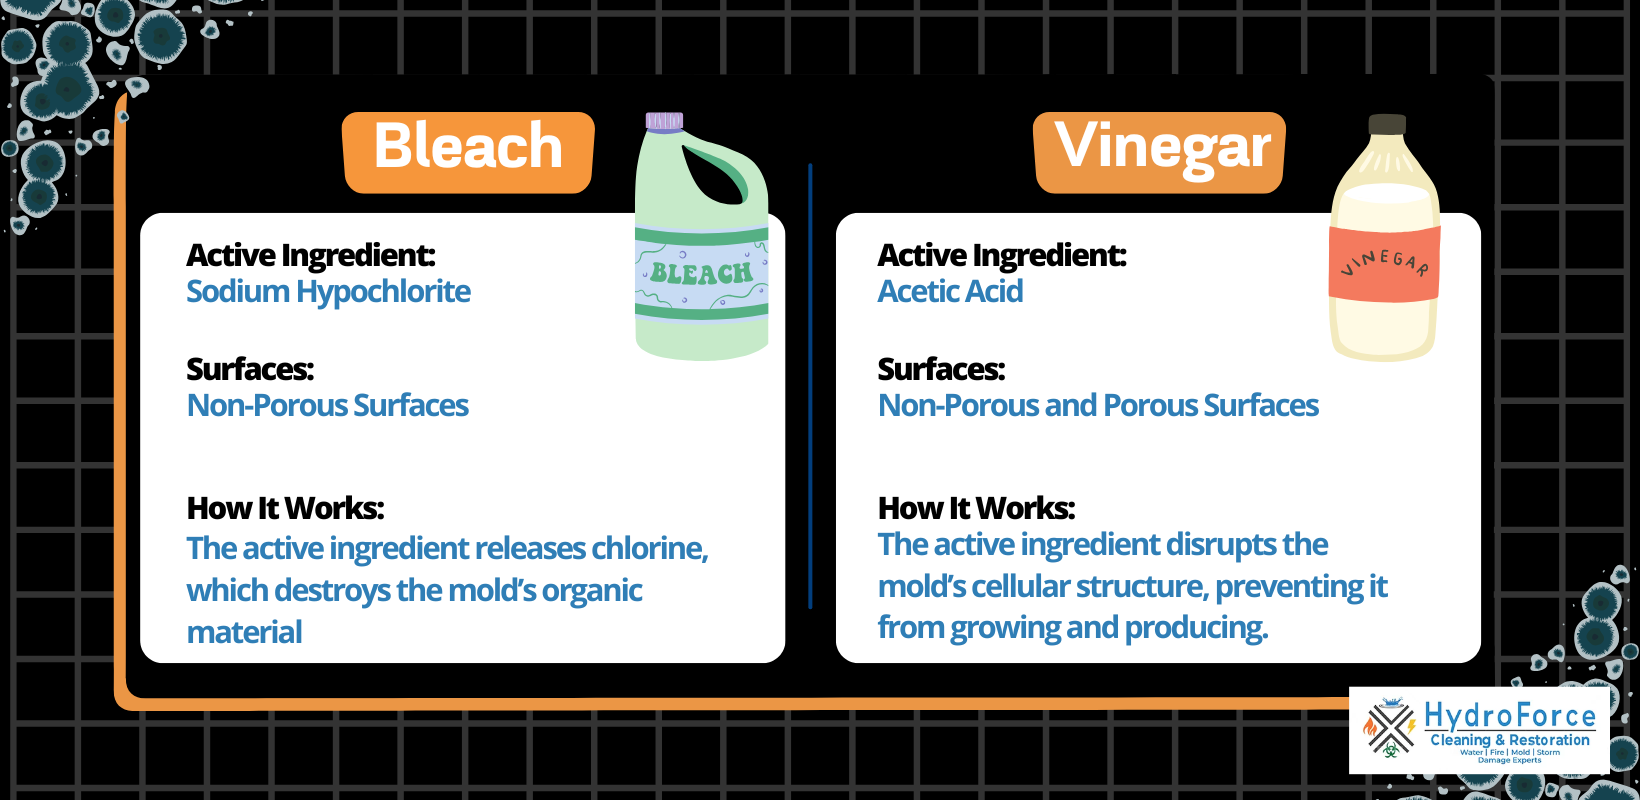
White vinegar is the top choice because it is:
- Non-toxic
- Leaves no harmful residue
- Doesn’t alter water taste after rinsing
Bleach works but requires extra rinsing and poses health risks if not fully flushed.
User Feedback Confirms
Real-world reports show vinegar users report better taste and fewer re-cleaning needs. Cleaning kits with vinegar-based solutions are especially popular for first-time cleaners.
Frequently Asked Questions About Primo Water Dispenser Cleaning
How often should I clean my Primo water dispenser?
Primo recommends cleaning every three months. However, clean sooner if you notice bad taste, slow flow, or high usage in multi-user environments.
Can I use bleach instead of vinegar to clean my Primo dispenser?
Yes, use 2 tablespoons of regular bleach if vinegar is unavailable. Bleach requires more thorough rinsing and should never be mixed with vinegar due to toxic fumes.
Why is my water dispenser draining slowly after cleaning?
Slow flow usually indicates mineral buildup that wasn’t fully removed. Repeat the vinegar cleaning, ensure you drained from the rear valve, and consider more frequent cleanings if you have hard water.
Do I need to clean the spouts separately?
Yes, spouts are high-touch areas where bacteria accumulate. Use Q-tips to swab the interior of both hot and cold spouts, as rinsing alone won’t remove biofilm buildup.
What happens if I skip the rear drain valve step?
Skipping the rear drain leaves sediment and scale trapped at the bottom of the reservoir. This causes recurring taste problems and reduces cleaning effectiveness over time.
Is it safe to use a cleaning kit from the store?
Yes, pre-measured cleaning kits are safe and convenient, especially for first-time users. They reduce mixing errors and work well with top-loading Primo models.
Key Takeaways for a Clean Primo Water Dispenser
Knowing how to clean a Primo water dispenser properly protects both your health and your machine. Clean every three months using white vinegar or bleach, always drain from the rear valve, and swab the spouts with Q-tips. These often-skipped steps make the difference between a quick rinse and a truly sanitary system.
Set a 90-day reminder on your calendar, gather your supplies, and schedule your next cleaning today. Your water will taste fresher, flow faster, and your dispenser will last longer with consistent care.