How to Clean Reverse Osmosis Systems

If your reverse osmosis (RO) system is producing slow flow, strange tastes, or visible slime, it needs immediate attention. Cleaning reverse osmosis systems goes beyond swapping filters; it requires full sanitization to protect water quality and extend the life of your unit. Whether you maintain a standard under-sink setup or are reviving a system that has sat unused for years, skipping proper cleaning invites bacterial growth, membrane damage, and unsafe drinking water. This guide walks you through every step, from spotting warning signs to selecting safe solutions and executing effective sanitization. You will learn how to disinfect housings, flush preservatives from new membranes, and avoid common pitfalls like using undiluted bleach.
Spot the Signs Your RO System Needs Cleaning
Warning Signs You Cannot Ignore
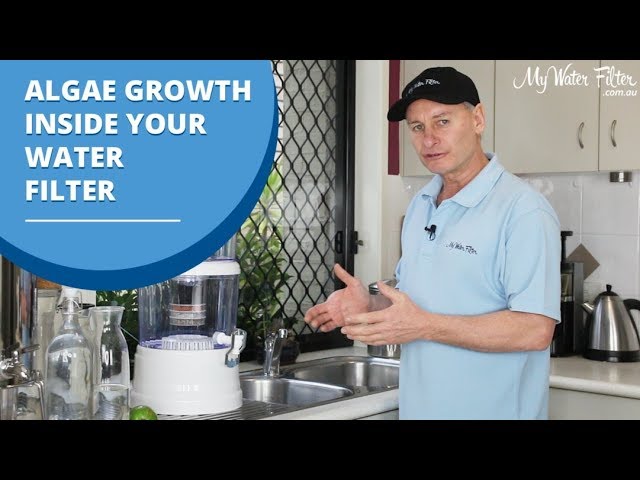
Your RO water should always taste clean and neutral. If it tastes off, smells like bleach, or flows slower than usual, contamination may be building up inside the system. Immediate cleaning is required if you spot mold, algae, or slime inside filter housings, tubing, or the drain line. A sudden drop in water pressure or a foul odor from the faucet signals microbial growth that needs urgent attention. Systems using well water face higher bacterial risks and need sanitizing more often. Even city water users are not immune; biofilm can develop over time, especially if the system sits idle for weeks.
Build a Preventive Cleaning Schedule
For most under-sink RO units using city water, annual sanitization is essential even when everything seems fine. Plan your cleaning during filter replacement, which typically happens every 6 to 12 months. This routine prevents biofilm buildup and keeps water tasting fresh. If your system sits unused for more than two weeks, sanitize it before turning it back on. Units stored for years in garages or basements need aggressive sterilization before reuse. Countertop models with glass carafes should be rinsed weekly and sanitized every 3 to 6 months depending on use.
Know When Filters and Membranes Must Be Replaced
Never try to sanitize old filters or membranes; they must be replaced. Pre-filters (sediment and carbon) trap contaminants and degrade over time, so swap them every 6 to 12 months. The RO membrane, which removes dissolved solids, lasts about 12 months under normal conditions. If your water has high pH above 7.5, membrane lifespan drops due to pinhole leaks. A remineralization filter, if present, should be changed every 6 months. Always sanitize when installing a new membrane because it ships coated in a preservative that affects taste and must be flushed out completely.
Select the Right Cleaning Solution
Best Sanitizers for RO Systems
Use only food-safe, non-corrosive sanitizers on your system. Commercial RO cleaners like Sani System are ideal because they are formulated specifically for membranes and plumbing. If those are unavailable, unscented household bleach (5 to 6% sodium hypochlorite) works well when diluted at 2 to 3 tablespoons per gallon of water. This concentration kills bacteria, mold, and viruses without damaging components when used correctly. Hydrogen peroxide at 1.5 to 3% is excellent for removing bleach odor after cleaning. Some users opt for iodophor (common in brewing) for soaking parts, but avoid rubbing alcohol unless your manufacturer specifies it.
Chemicals to Avoid Completely
Never use ammonia, vinegar, or undiluted bleach in your RO system. Mixing bleach with ammonia creates toxic chloramine gas. Vinegar is too weak for effective disinfection and may not eliminate acetic bacteria. Strong acids or alkalis like muriatic acid or pure lye can destroy membranes and crack plastic housings. Scented or thickened bleach products contain additives that clog filters and damage seals. Always follow manufacturer guidelines; using unauthorized chemicals may void your warranty.
Specialized Cleaners for Membrane Fouling
When performance drops despite regular maintenance, the membrane may be fouled. Use pH-specific cleaners based on the contaminant type:
- High pH (alkaline) cleaners: Target biological slimes and organic matter. Sodium hydroxide solutions below pH 12 help disperse biofilms.
- Low pH (acidic) cleaners: Remove mineral scale like calcium and iron. Diluted hydrochloric acid is effective but must be used after alkaline cleaning to avoid compacting organic debris.
Never reverse the order; cleaning acidic first can lock organic material into the membrane. For industrial systems, consult a specialist for foulant analysis before choosing a cleaner.
Gather Tools and Prepare Your Workspace
Essential Tools for RO Cleaning
Before starting, gather the following:
- Filter housing wrench for opening plastic canisters
- Adjustable wrench or pliers for stubborn fittings
- Needle-nose pliers to extract stuck membranes
- Scissors or razor blade to cut drain lines cleanly
- Bicycle pump with pressure gauge to test tank air pressure
- Clean bucket for draining wastewater
A drain line shut-off valve (around $12) is optional but helpful; it lets you trap sanitizer inside the system for deeper cleaning.
Set Up a Safe Work Area
Turn off the main water supply and tank shut-off valve first. Open the RO faucet to release pressure. Place a clean towel under the unit to catch drips and protect surfaces. Wear rubber gloves and safety goggles since you will handle bleach and pressurized components. Wash hands thoroughly before touching internal parts. If mold is visible on the exterior, spray with disinfectant, scrub crevices with a toothbrush, then rinse and dry completely before opening the system.
Never Use Hot Water
RO components are made of plastic and rubber designed for cold water only. Water above 100°F (38°C) can warp housings, melt seals, and ruin the membrane. Always use room-temperature water for mixing solutions and rinsing. Do not place filter housings in dishwashers or soak them in hot water.
Follow the Step-by-Step Sanitization Process
Shut Off and Drain the System
- Turn off the water supply valve by rotating the ball valve 90 degrees.
- Close the tank shut-off valve.
- Open the RO faucet and let it run until flow stops; this takes 10 to 15 minutes and depressurizes the system.
- Drain the storage tank:
– Push down the collar on the yellow tube at the tank.
– Pull it out and direct into a sink or bucket.
– Open the tank valve and let all water drain for 2 to 3 minutes.
– Reconnect the tube once empty.
Remove Old Components Safely
Use the filter wrench to unscrew Stage 1 (sediment), Stage 2 (carbon), and Stage 3 housings. Discard old filters; do not reuse them. For the RO membrane:
- Disconnect tubing from quick-connect fittings by pushing in the collar and pulling.
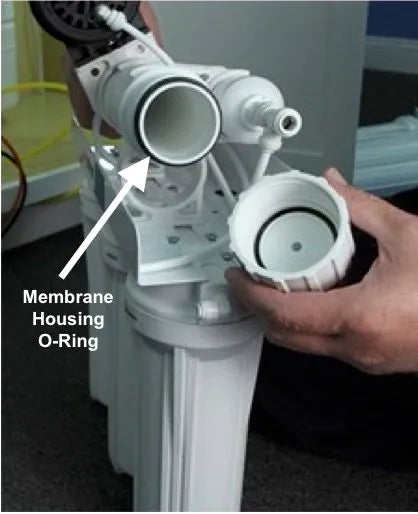
- Unscrew the membrane housing cap.
- Use needle-nose pliers to gently twist and pull out the old membrane. Discard it permanently.
Inspect O-rings for cracks or swelling. Replace if damaged; leaky seals cause poor performance.
Reassemble for Sanitizer Circulation
Reattach empty filter housings to the manifold with no filters inside. Reconnect the empty membrane housing and post-filter housing. If installing a drain shut-off valve, cut the drain line straight with a razor and insert the valve. Leave it open for now.
Add Sanitizer and Trap It Inside
Pour 3 tablespoons of bleach per gallon of water (or commercial RO cleaner) directly into the Stage 1 housing. Screw it back on tightly. Turn the main water supply back on. Let water flow through until you see liquid exiting the drain line.
Then close the drain shut-off valve immediately to trap sanitizer in the system. Open the tank valve fully so the storage tank fills with the cleaning solution. You may hear a hissing sound; it stops when the tank is full.
Soak for 5 to 30 Minutes
Let the solution sit:
- 5 to 10 minutes for routine annual cleaning
- Up to 30 minutes for long-idle or contaminated systems
This soaks the tank, faucet, lines, and housings. Wear eye protection because opening the faucet later may cause splashing.
Flush and Reassemble the System
First Flush and Drain
After soaking:
- Open the RO faucet and let water run for 5 minutes to flush the line.
- Keep the faucet open, then turn off input water.
- Let the tank drain completely until flow slows to a drip.
- With water off, remove each housing and empty residual sanitizer into a bucket.
Final Rinse Cycles
- Close the drain valve and faucet.
- Turn the water supply back on.
- Let the system refill and the tank fill again.
- Once full, drain the tank again by shutting off input and opening the faucet.
Repeat this three total fill-and-drain cycles, especially after installing a new membrane.
Eliminate Bleach Smell
If a chlorine odor remains:
- Mix 1.5% hydrogen peroxide (3% peroxide combined with equal water).
- Pour into the Stage 1 housing.
- Run through the system and let sit for 1 hour.
- Flush again with clean water.
Alternatively, aerate the final rinse water overnight with an airstone.
Install New Filters and Membrane
Insert Fresh Components
Now install your replacements:
- Sediment filter (Stage 1): Removes rust and particles
- Carbon block (Stage 2/3): Reduces chlorine, VOCs, and lead
- Post-filter: Polishes taste
- New RO membrane: Insert with O-ring lubricated using water, not oil
Twist filters until snug but do not overtighten. Reconnect all tubing securely.
Flush Preservatives from New Membrane
New RO membranes contain a preservative solution that causes off-flavors and must be removed. Perform three full tank flushes:
- Let the tank fill for 2 to 3 hours.
- Drain completely.
- Repeat two more times.
Only after this is the water safe to drink.
Handle Special Cases: Idle and Countertop Units
Revive a Long-Idle RO System
For systems unused over 2 years:
- Disassemble completely by removing all filters, membrane, and resin.
- Remove the permeate pump if present; it cannot be cleaned in place.
- Soak all parts (housings, lines, tank) in a 10% bleach solution for 30 or more minutes.
- Rinse thoroughly.
- Reassemble with brand-new filters and membrane.
- Cycle hydrogen peroxide through to remove odor.
- Perform three full flushes.
This kills deep-seated biohazards and restores function.
Maintain Countertop RO Units
Models like Bluevua have unique needs:
- Filter life: 6 to 12 months for sediment; 1 to 2 years for 5-in-1 composite filters
- Self-cleaning cycles: Run monthly to flush internal pipes
- Descaling: Use manufacturer kits in hard water areas
- Storage: If inactive, empty both raw water and storage tanks. Store filters in sealed bags away from sunlight.
- Carafes: Borosilicate glass units are dishwasher-safe. Plastic tanks are hard to clean internally; replace if discolored.
Check Tank Pressure and Performance

Test Storage Tank Air Pressure
Low pressure causes weak flow. To check:
- Drain the tank completely.
- Locate the air valve at the bottom, under a cap.
- Use a bicycle pump gauge to measure pressure.
- The ideal range is 5 to 7 PSI (check your manual for your model).
If below 5 PSI, add air slowly. Too much pressure above 10 PSI can rupture the bladder.
Monitor Water Quality
Track these metrics:
- TDS (Total Dissolved Solids): Use a TDS meter. Inlet and outlet readings should show 95 to 98% rejection. If rejection drops below 85%, the membrane may be failing.
- Flow rate: Should refill a cup in about 15 seconds. Slower flow means clogged filters or low tank pressure.
- Waste ratio: Healthy systems produce 3 to 4 gallons of waste per 1 gallon purified. Higher ratios suggest inefficiency.
Keep a log of filter changes, sanitization dates, and TDS readings to catch issues early.
Troubleshoot Common Post-Cleaning Issues
No Water or Slow Flow
Check the following:
- Tank air pressure must be 5 to 7 PSI when empty
- All valves open (input, tank, drain)
- Tubing kinked or blocked
- New membrane not flushed enough; preservative can temporarily restrict flow
Replace clogged pre-filters if flow remains slow.
Persistent Bad Taste or Smell
Common causes include:
- Incomplete flushing of new membrane (do 3 cycles)
- Trapped bleach in dead ends; cycle hydrogen peroxide
- Old post-filter; replace it
- Contaminated faucet; soak in vinegar or bleach solution
Continuous Drain Flow
Water bypassing the membrane indicates:
- Faulty check valve; replace it
- Low tank pressure; recharge to 5 to 7 PSI
- Leaking shut-off valve; inspect and replace
This wastes water and reduces efficiency.
Follow Safety and Best Practices
Handle Chemicals Safely
Always follow these precautions:
- Wear gloves and eye protection
- Work in a well-ventilated area
- Never mix bleach with vinegar, ammonia, or acids; this creates deadly fumes
- Store chemicals away from children and food
Prevent Damage During Cleaning
Keep these guidelines in mind:
- Never run undiluted bleach through the system
- Do not reuse old filters or membranes; they harbor bacteria
- Avoid hot water; it damages seals and membranes
- Dispose of used filters properly; they contain concentrated contaminants
Maintain Warranty and Longevity
Follow manufacturer instructions exactly. Using strong acids, high heat, or non-approved cleaners voids warranties. Stick to recommended chemicals and pH levels. Sanitize annually, replace filters on schedule, and flush new membranes fully. Consider adding a drain line shut-off valve; it makes future cleanings faster and more effective.
Frequently Asked Questions About Cleaning RO Systems
How often should I sanitize my reverse osmosis system?
For most under-sink units using city water, annual sanitization during filter replacement is sufficient. If you use well water or notice any signs of contamination, clean more frequently. Systems sitting idle for more than two weeks should also be sanitized before reuse.
Can I use vinegar to clean my RO system?
No, vinegar is not recommended. It is too weak for effective disinfection and may not eliminate acetic bacteria. Use unscented household bleach diluted at 2 to 3 tablespoons per gallon, or a commercial RO cleaner like Sani System instead.
Why does my new RO membrane taste bad?
New membranes ship coated in a preservative solution that causes off-flavors. You must perform three full tank fill-and-drain cycles to flush it out completely before drinking the water.
What should I do if I still smell bleach after cleaning?
Cycle a 1.5% hydrogen peroxide solution through the system and let it sit for 1 hour, then flush again with clean water. You can also aerate the rinse water overnight using an airstone to dissipate the odor.
How do I know if my RO membrane needs replacing?
Check the TDS rejection rate with a meter. Healthy membranes reject 95 to 98% of dissolved solids. If rejection drops below 85%, or if flow rate decreases significantly despite clean filters, replace the membrane. Under normal conditions, membranes last about 12 months.
Is hot water safe for cleaning RO components?
No, never use hot water on RO components. Water above 100°F (38°C) can warp plastic housings, melt seals, and permanently damage the membrane. Always use room-temperature water for mixing solutions and rinsing parts.
Key Takeaways for Cleaning Your Reverse Osmosis System
Cleaning your reverse osmosis system is not optional; it is essential for safe, great-tasting water. Sanitize annually during filter replacement, flush new membranes with three full cycles, and never use undiluted bleach or hot water. Monitor tank pressure (5 to 7 PSI) and TDS rejection rates (95 to 98%) to catch problems early. Whether you maintain an under-sink unit or a countertop model, consistent care prevents biofilm, maintains flow, and ensures peak performance. Start your cleaning today and your RO system will deliver pure water for years to come.