How to Install Under Sink Reverse Osmosis System
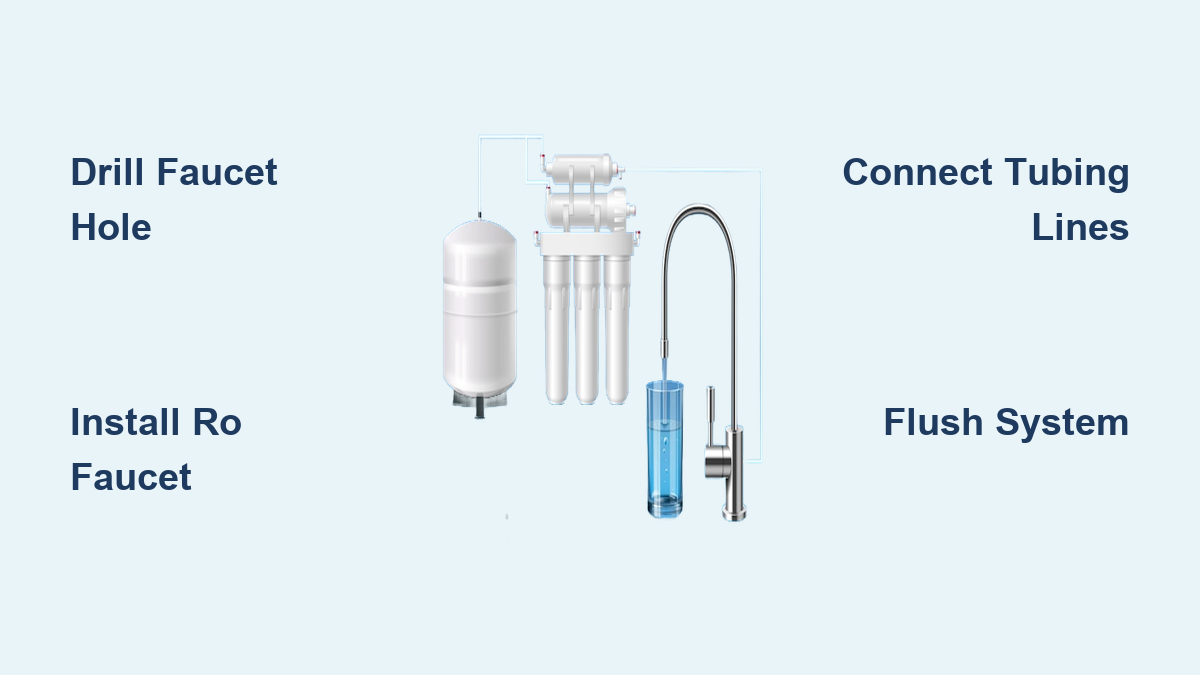
Is your tap water leaving an odd taste or carrying concerns about lead, chlorine, or fluoride? Installing a reverse osmosis system under your sink is one of the most effective ways to secure clean, safe drinking water right at your kitchen tap. Unlike simple pitcher filters, RO systems strip out up to 99% of dissolved solids, heavy metals, and microorganisms, delivering water that tastes noticeably better. The best part? With basic tools and a clear walkthrough, you can install a reverse osmosis system under your sink in 2 to 4 hours, even without professional plumbing experience. This guide covers every phase, from planning and drilling to tubing connections and final flushing, so you can enjoy purified water with total confidence.
Reverse Osmosis System Components and How It Works
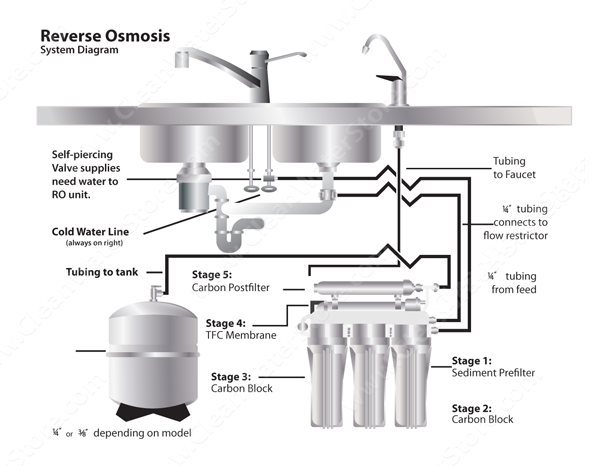
Before grabbing your tools, it helps to understand what you’re actually installing and how each part contributes to clean water.
The RO Filtration Process
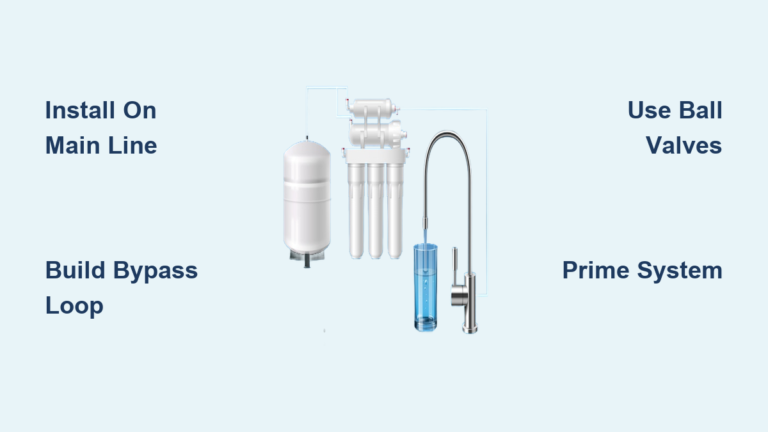
Reverse osmosis pushes water through a semi-permeable membrane that traps contaminants while letting pure H₂O molecules pass through. This molecular-level filtering removes lead, arsenic, nitrates, fluoride, and bacteria far more effectively than standard carbon filters. Most under-sink units run a five-stage process:
- Sediment filter captures rust, sand, and debris
- Pre-carbon filter strips chlorine and VOCs to protect the membrane
- RO membrane filters dissolved solids and heavy metals
- Post-carbon filter polishes water for cleaner taste
- Remineralization stage (optional) adds back calcium and magnesium for balanced pH
What’s Included in Most RO Kits
Unboxing your system, you’ll typically find filter housings and cartridges, a pre-charged storage tank (7–8 psi), a dedicated RO faucet, color-coded tubing, a feed water adapter, a drain saddle, and mounting hardware. Tubing colors matter: red or orange for supply, black for drain, and blue or white for product water.
Plan Your Installation Location
A successful install starts with choosing the right spot and verifying your home’s water conditions.
Measure Under-Sink Space
Your RO system needs roughly a 2×2 foot footprint. Measure the cabinet area and confirm room for three to five filter canisters, a 3- to 4-gallon storage tank, and clearance below the filters for future cartridge swaps. If a garbage disposal or deep basin crowds the space, consider remote mounting in a basement or utility closet. Just run tubing through the floor and avoid any area that drops below freezing.
Check Water Pressure and Quality
RO systems perform best between 50 and 80 psi. If your pressure runs below 40 to 45 psi (common with well systems or high-elevation homes), you’ll need a booster pump. Also test for hardness above 4 gpg, which calls for a water softener upstream, and iron above 0.3 ppm, which requires an oxidizing filter. A quick TDS meter reading on your tap water tells you what you’re working with; readings above 250 ppm mean more frequent membrane replacements.
Tools and Materials Checklist
Essential Tools
Gather these before starting:
• Adjustable wrench
• Flathead and Phillips screwdrivers
• Drill with a 7/8-inch hole saw (for laminate) or diamond bit (for stone)
• 1/4-inch drill bit for the drain saddle
• Tape measure and level
• Hacksaw for drain pipe modifications
• Tubing cutter or sharp utility knife
• Teflon tape
• Bucket and towels for spills
Most kits include mounting hardware, O-rings, and lubricant, so you won’t need extras unless you’re replacing worn parts.
Install the Dedicated RO Faucet
Your filtered water needs its own tap, and that means mounting a faucet through the countertop or sink.
Locate or Drill the Faucet Hole
Many sinks have a spare hole originally meant for a soap dispenser or sprayer. If yours does, you’re set. If not, you’ll need to drill.
For laminate countertops, use a 7/8-inch hole saw and drill slowly to prevent chipping. Place painter’s tape over the mark first to reduce cracking. For granite, quartz, or stone, switch to a diamond-coated bit, keep your speed low, and spray water on the bit to manage heat. If you’re unsure about drilling stone, hire a pro; one wrong move can crack an expensive countertop.
Mount and Secure the Faucet
- Feed the faucet stem through the hole
- Slide on the rubber washer, flat washer, star washer, and hex nut underneath
- Hand-tighten the nut, then snug it with a wrench (don’t overdo it)
- If clearance is tight, connect the blue product water tubing before final tightening
Skip Teflon tape on push-to-connect fittings; they seal with internal O-rings, and tape can actually cause leaks.
Connect the Water Supply and Drain Lines
This phase links your RO system to your home’s cold water and drain plumbing.
Shut Off Water and Relieve Pressure
Close the cold-water shutoff valve under the sink, then open the kitchen faucet to drain residual pressure. Keep a bucket and towel handy for drips.
Install the Feed Water Adapter
- Disconnect the cold-water line from the shutoff valve
- Wrap the adapter threads with 3 to 4 wraps of Teflon tape (clockwise)
- Screw in the angle stop valve or feed water adapter
- Reconnect the original faucet line to the new adapter
- Hand-tighten first, then secure with a wrench; avoid over-tightening plastic fittings
Attach the Drain Saddle
Position matters here. Install the saddle on the vertical tailpiece of the drainpipe, above the P-trap, and as far from the garbage disposal as possible. Mark your spot and drill a 1/4-inch hole through just one side of the pipe. Place the rubber gasket on the saddle, align it with the hole, and bolt the pieces together snugly. Push the black drain tube into the saddle port until it clicks into place.
Never mount the saddle on the bottom of a horizontal pipe; debris collects there and causes clogs.
Mount the System and Install Filters
With plumbing connections ready, it’s time to secure the unit and load the filters.
Secure the Filter Manifold
Use a level to mark mounting points on the cabinet wall. Install hanger washers or a bracket at least 15.5 inches from the floor, then snap or screw the manifold into place.
Load the Filters and RO Membrane
- Unscrew each filter housing and drop in the matching cartridge (sediment first, then carbon)
- Hand-tighten the caps securely
- For the RO membrane, lubricate the O-ring with the provided silicone grease, slide it into the housing until fully seated, and reattach the cap
- Install the post-carbon filter last for final polishing
Label each stage if your kit doesn’t already color-code them; future filter changes become much easier.
Connect the Color-Coded Tubing
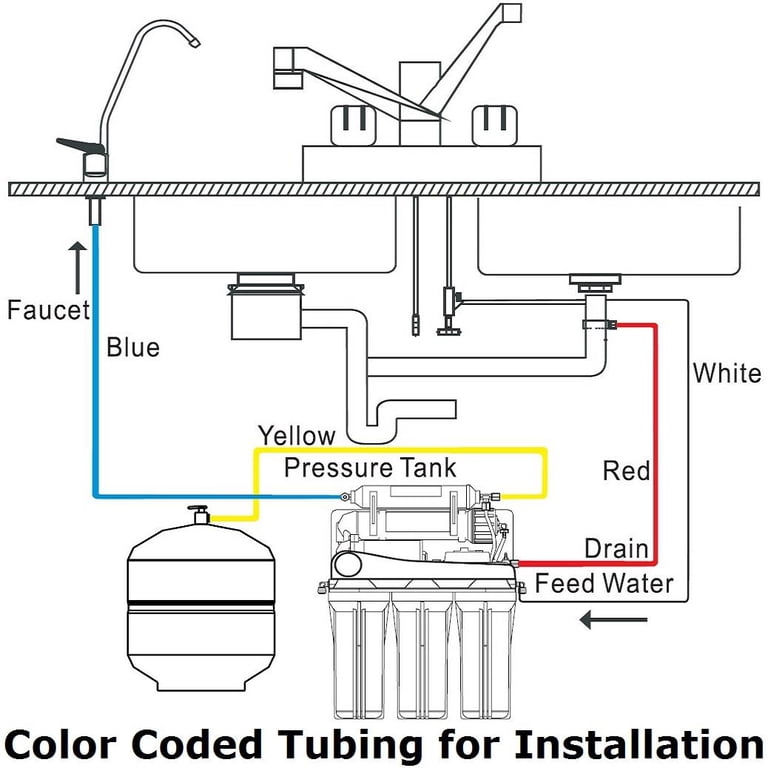
Each line has a specific role, and getting connections right prevents leaks and poor performance.
Supply Line (Red or Orange)
Runs from the feed water adapter to the sediment filter inlet. Push firmly into the quick-connect fitting until you hear a click.
Drain Line (Black)
Connects from the membrane brine outlet to the drain saddle. Confirm any required flow restrictor is installed per your model’s instructions.
Tank Line (Yellow or Green)
Links the storage tank valve to the tank inlet on the RO unit. Wrap the tank nipple threads with about 6 wraps of Teflon tape, then hand-tighten the shutoff valve; plastic threads strip easily.
Faucet Line (Blue or White)
Runs from the post-filter outlet to the RO faucet. Cut the tubing cleanly with no burrs, then push fully into the fitting until it clicks.
After every connection, give the tubing a firm tug. If it slides out, it wasn’t seated properly.
Startup, Flushing, and Leak Checks
Now for the moment of truth: bringing the system online.
Pressurize and Inspect for Leaks
Close the tank valve (handle perpendicular to the tubing), then slowly open the feed water valve. Walk every connection with a flashlight and towel, checking for drips. Tighten anything that leaks, but don’t force plastic fittings.
Flush the System
Open the RO faucet and let water run for 10 to 15 minutes. Expect black or cloudy water at first; this is normal carbon dust from new filters. Keep flushing until the water runs clear, then close the faucet.
Complete Fill-and-Drain Cycles
Open the tank valve and let the tank fill completely (1 to 3 hours depending on pressure). Once full, open the faucet and drain the entire tank. Repeat this cycle two to three times to flush out all preservatives and residues. Some manufacturers recommend running the system for a full 24 hours before regular use.
Test Water Quality and Performance
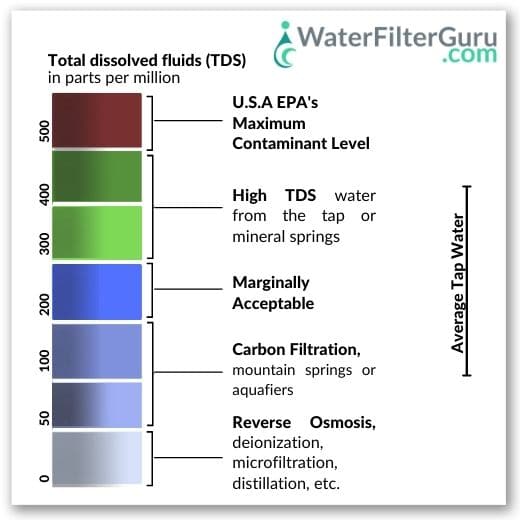
After the system cycles through, verify it’s actually doing its job.
Measure TDS Reduction
Use a TDS meter to compare readings:
• Tap water: Note your baseline
• RO water: Should read under 10 ppm
• Reduction rate: 90% to 99% depending on source water
If you’re using the water for aquariums or sensitive applications, test pH as well. Target 6.5 to 7.0 unless you’ve added a remineralizer.
Confirm Drain Flow
Verify a steady drip from the waste line. This confirms the system is rejecting contaminants properly. If the drain runs dry, something’s wrong with the membrane or flow restrictor.
Maintenance Schedule and Troubleshooting
A little routine care keeps your RO system performing at its best for years.
Filter Replacement Timeline
• Sediment and pre-carbon filters: Every 6 to 12 months
• Post-carbon filter: Every 12 months
• RO membrane: Every 2 to 5 years (inspect annually)
• Storage tank: Replace every 5 to 7 years
• Tank air pressure: Check at every filter change (7–8 psi when empty)
Common Problems and Fixes
Black water at startup? This is harmless carbon fines. Flush for 10 to 15 minutes until clear.
Slow water production? Check your home’s pressure. Below 40 psi means you need a booster pump. Also inspect pre-filters; clogged cartridges choke flow.
Leaking fittings? Usually caused by tubing that wasn’t fully inserted or over-tightened plastic parts. Disconnect, re-cut the tubing squarely, and reinsert until it clicks.
Noisy operation? Air in the lines is normal during initial use. Let the system run for 5 to 10 minutes. Persistent noise suggests loose connections.
Prevent Corrosion Issues
RO water is low in minerals and can be slightly corrosive to copper pipes over time. Protect your plumbing by using PEX or food-grade plastic tubing for the final faucet line, and avoid direct copper contact with RO water.
When to Call a Professional
DIY installation works for most homeowners, but some situations call for expert help:
• Drilling into granite, quartz, or stone countertops
• Sinks with no extra hole and risky drilling conditions
• Need to relocate water or drain lines significantly
• Installing a remote system from basement to kitchen
• Lack of basic plumbing tools or confidence
Professional installation runs around $2,000 or more, but includes labor, cleanup, and full system testing.
Frequently Asked Questions About Reverse Osmosis Installation
How long does it take to install an under-sink RO system?
Most DIY installations take 2 to 4 hours, depending on whether you need to drill a faucet hole or modify plumbing. Professional installers typically finish in 1 to 2 hours.
Do I need a booster pump for my RO system?
If your home’s water pressure runs below 40 to 45 psi, yes. Low pressure is common with well systems using 30/50 pressure switches or homes at high elevation. A booster pump restores proper production rates.
What size hole do I drill for the RO faucet?
The standard faucet hole is 7/8-inch in diameter. For laminate countertops, a 1-inch hole saw works well. For granite or quartz, use a diamond-coated bit to prevent cracking.
How often should I change RO filters?
Replace sediment and pre-carbon filters every 6 to 12 months, post-carbon filters every 12 months, and the RO membrane every 2 to 5 years. Your source water quality affects the exact timeline.
Is RO water safe for aquariums?
Yes, RO water is ideal for aquariums because it lets you control pH and hardness precisely. However, pure RO water lacks minerals fish need, so you’ll need a remineralizer or to blend it with tap water for stable parameters.
Why is my RO water black at first?
Black or cloudy water during the initial flush is normal carbon dust from new filters. Run water through the system for 10 to 15 minutes until it clears completely.
Key Takeaways for Installing Your Under-Sink RO System
Installing a reverse osmosis system under your sink is one of the smartest upgrades you can make for your household’s water quality. With push-to-connect fittings and color-coded tubing, most DIYers can finish in a single afternoon. Remember to flush the system thoroughly during startup, check tank pressure annually, and replace filters on schedule to keep performance consistent.
Your next step is simple: gather your tools, pick a Saturday, and follow this guide phase by phase. Within hours, you’ll have crisp, clean water on demand, no plastic bottles required, just peace of mind with every glass.