How to Install Kinetico Water Filter

Planning a Kinetico water filter installation can feel overwhelming, especially when hard water leaves scale on faucets and ruins appliances. Many homeowners invest in Kinetico systems because they deliver soft, clean water without relying on electricity to regenerate. Getting the installation right protects your plumbing, extends the life of the system, and ensures you get the water quality you paid for.
This guide covers every critical phase of Kinetico water filter installation, from choosing the right location to setting compensated hardness and replacing filters. You’ll learn how to avoid warranty-voiding mistakes, follow local plumbing codes, and keep your system running efficiently for years.
Choose the Right Installation Location

Ensure Dry, Accessible Placement
Install the Kinetico unit in a dry, indoor area with enough clearance for the softener tank, brine drum, and any pre-filters. Avoid damp basements or crawl spaces unless they offer easy access to the top of the brine drum for salt refills and routine maintenance.
Verify Electrical and Drain Access
While the core system is non-electric, models with digital monitors require a standard electrical outlet nearby. Confirm outlet proximity during site selection. Also, ensure a nearby floor drain, sump, or sewer connection is available for the regeneration cycle, which discharges 50 to 100 gallons of wastewater.
Position Leak Detectors Correctly
If using a leak detection device, install it after the main shutoff valve. Placing it before the valve limits accessibility and defeats its purpose during emergencies or maintenance.
Identify Main Water Supply and Bypass Zones
Locate Primary Water Entry Point
Begin at the main water line where it enters your home, typically through a foundation wall connected to a main shutoff valve. This is your primary connection point. Keep the area unobstructed for future service access.
Designate Softened vs. Bypassed Water Zones
Not all water needs softening. To reduce strain on the system and preserve filter life:
• Route softened water to indoor fixtures like showers, sinks, laundry, and drinking water taps.
• Bypass outdoor spigots (usually two) to prevent unnecessary wear on dechlorination filters and resin tanks.
This zoning approach reduces salt and water usage during regeneration cycles.
Install Pre-Treatment Components First
Add Pressure Regulator if Needed
If incoming water pressure exceeds 80 psi, install a pressure-reducing valve after the main shutoff but before the softener. High pressure can damage internal components and void your warranty.
Match Pre-Treatment to Your Water Source
For city water, install a dechlorination filter to protect the resin bed from chlorine degradation. For well water, skip the dechlorination stage entirely. Adding unnecessary filtration can interfere with iron removal and upset system balance.
Connect the Drain Line with Code Compliance

Select an Approved Drain Connection
The regeneration cycle requires a reliable drain path. Acceptable options include a floor drain with a visible air gap, a sewer standpipe, or a direct sewer connection with proper backflow prevention.
Follow Local Plumbing Codes
Most jurisdictions require either an air gap or a backflow preventer to avoid contaminating potable water. Never submerge the drain line in water, as this creates a siphon risk.
Use Proper Tubing and Height
Use 3/4″ rigid PVC or poly tubing. Maintain a minimum 2-inch air gap between the drain line outlet and the flood rim of the receiving fixture.
Set Compensated Hardness Accurately
Test Water for Hardness, Iron, and Manganese
Before startup, test your water for hardness (in grains per gallon), iron (ppm), and manganese (ppm). These values determine regeneration frequency and resin efficiency.
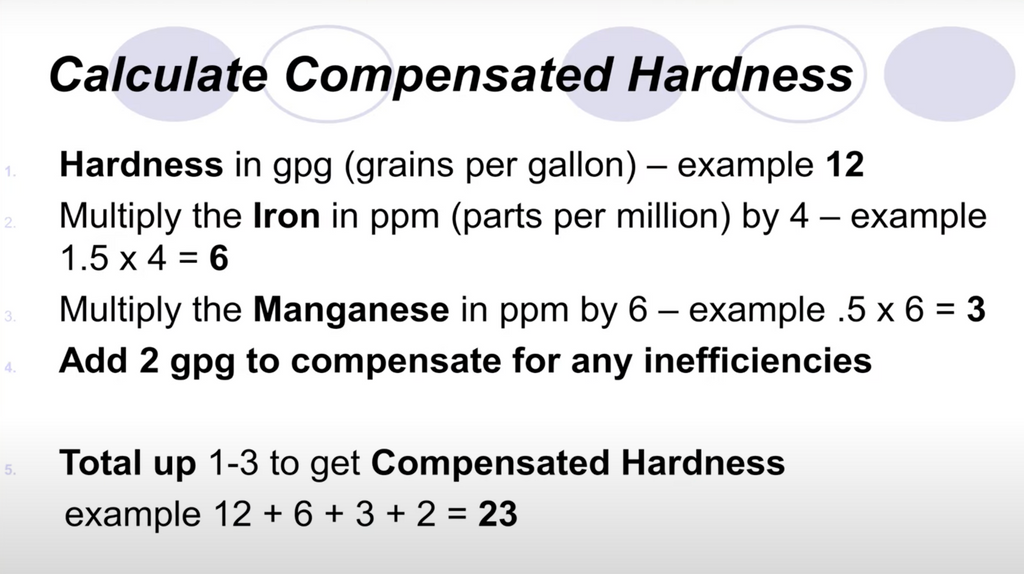
Calculate Compensated Hardness
Use this formula to account for minerals that foul resin:
Compensated Hardness = Hardness (gpg) + (Iron × 5) + (Manganese × 5)
Example calculation:
• Hardness: 15 gpg
• Iron: 2 ppm (2 × 5 = 10)
• Manganese: 0.5 ppm (0.5 × 5 = 2.5)
• Total: 15 + 10 + 2.5 = 27.5 gpg
Enter 27.5 into the control panel to ensure accurate regeneration scheduling.
Start Up the System Properly
Follow the Manufacturer Startup Sequence
After completing plumbing connections:
- Open bypass valves to allow water into the system.
- Flush lines for several minutes to remove debris and trapped air.
- Initiate a manual regeneration cycle to prime both resin tanks.
Wait Before Testing Water
Allow 24 to 48 hours of operation before testing water quality. This ensures the resin beads are fully charged and stabilized.
Confirm Blue Line for Softened Water
On plumbing schematics, the blue line indicates softened water flow. Verify all designated fixtures receive water from this line.
Replace Pre-Filter Cartridge: 10-Step Process
Engage Bypass Mode First
Turn the bypass valve until the yellow section appears in the dial window. This isolates the system and prevents flooding during filter changes.
Depressurize the System Safely
Locate the two 3/8″ plastic valves: one at the prefilter head and one near the softener connection. Open both to release pressure and wait at least one minute before proceeding.
Remove the Filter Housing
Turn the sump clockwise (viewed from above) to unscrew it. Support the housing because it may contain water. Use a sump removal wrench if the housing is stuck.
Extract and Inspect the Cartridge
Remove the old cartridge by turning it clockwise. Discard disposable cartridges or soak reusable ones in Iron Out or a dealer-approved cleaner, then rinse and dry.
Clean Housing and Check O-Ring
Empty water from the sump and inspect the O-ring for cracks or debris. Lubricate only with silicone lubricant. Never use petroleum jelly, as it voids the warranty.
Install the New Filter
Insert the new cartridge and turn it counter-clockwise until seated. Align the arrow on the sump with the arrow on the head, then screw the housing on counter-clockwise until snug.
Re-pressurize and Test
Close both 3/8″ valves and return the bypass handle to the green visible position. Check for leaks and tighten slightly if dripping occurs.
Flush the System Briefly
Run water for one to two minutes to clear air and loose particles.
Maintain the Kinetico K5 Drinking Water Station
Recognize Filter Replacement Time
Replace K5 filters every six months or when the blue indicator light disappears. High usage or poor water quality may require earlier changes.
Know the Filter Order and Flow Path
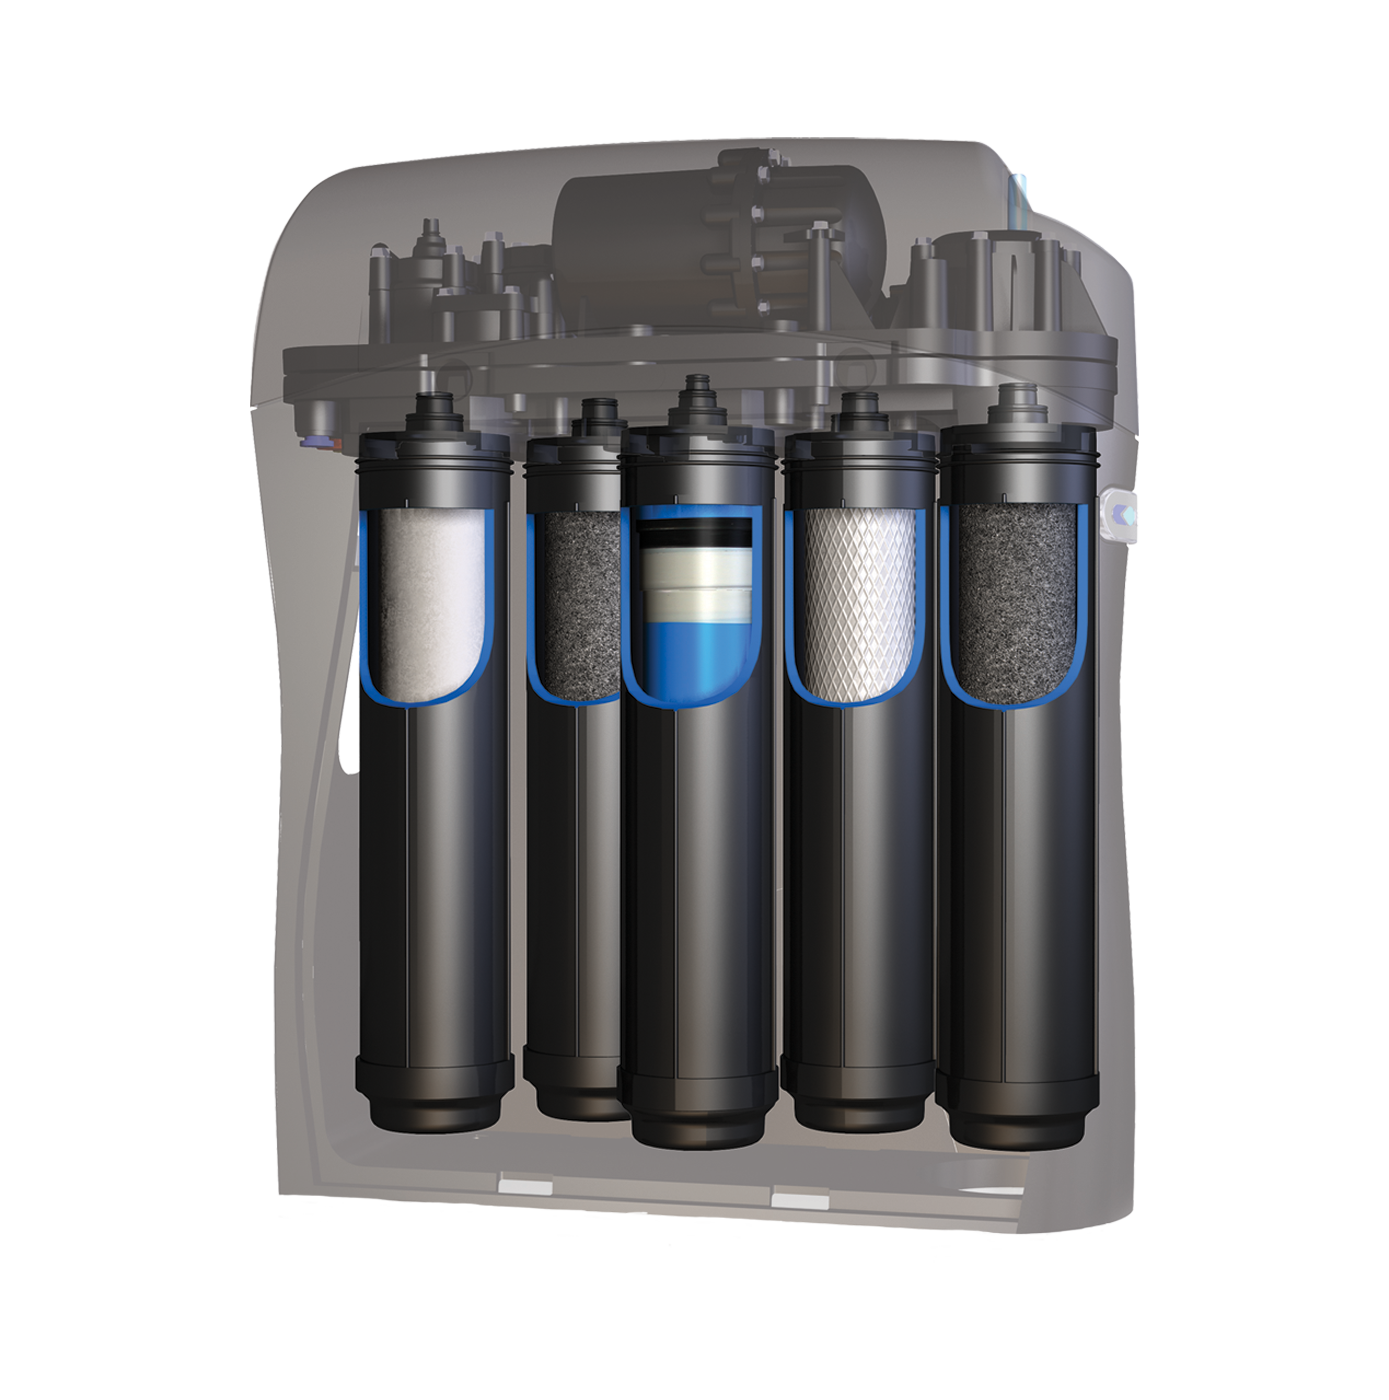
The K5 uses three stages in sequence: pre-filter (sediment), VOC filter (chemicals and odors), and post filter (polishing). Remove in reverse order and install in flow order.
Shut Off Water Before Service
Close the blue angle stop valve with a quarter-turn upward, then close the storage tank valve. Open the K5 faucet until flow stops to relieve pressure.
Replace Filters in Correct Sequence
Under the sink, remove the post filter first, then the VOC filter, then the pre-filter, all turned clockwise. Install new filters in reverse order: pre-filter, VOC, then post filter, each turned counter-clockwise to lock.
Restore and Pressurize the System
Open the storage tank valve, then the inlet valve. Open the faucet until flow reduces to a trickle, then close immediately. Wait up to one hour for full pressurization. The blue light should return when complete.
Avoid Common Installation Mistakes
Forgetting Bypass Mode
Failing to engage bypass before opening the filter housing causes sudden water spray and potential flooding. Always check the bypass valve first.
Using the Wrong Lubricant
Petroleum jelly damages O-rings and voids warranties. Use only silicone lubricant approved by Kinetico or an authorized dealer.
Over- or Under-Tightening the Housing
Hand-tighten the sump and avoid using tools. If leaks occur after startup, a slight snug adjustment may be needed, but over-tightening cracks the housing.
Ignoring Model-Specific Filters
Kinetico models vary in filter requirements. Always check the model number label near the filter housing before purchasing replacements.
Optimize Performance with Pro Tips
Schedule Filter Replacements
Set calendar reminders every six months for K5 filters and six to twelve months for whole-home pre-filters based on water conditions.
Use Genuine Kinetico Filters
Third-party filters may fit but lack proper filtration media or seals. Stick with genuine Kinetico parts, which cost around $25 to $30 each, to ensure compatibility and warranty protection.
Conduct Annual Visual Inspections
Check for salt bridging in the brine tank, sediment buildup in the pre-filter, leaks or corrosion at connections, and proper drain line positioning.
Consult a Dealer for Complex Issues
For system programming, electronic diagnostics, or unusual water conditions like high iron, contact an Authorized Independent Kinetico Dealer.
Frequently Asked Questions About Kinetico Water Filter Installation
How long does Kinetico water filter installation take?
For experienced installers, the pre-filter replacement process takes less than 15 minutes. A full system installation typically requires several hours, plus 24 to 48 hours of stabilization before testing water quality.
Do Kinetico systems need electricity?
No. Kinetico systems use kinetic energy from water flow to power regeneration. However, models with digital monitors require a standard electrical outlet and often include battery backups for power outages.
What is compensated hardness and why does it matter?
Compensated hardness accounts for hardness, iron, and manganese content in your water. The formula multiplies iron and manganese ppm by five and adds them to the hardness value. Setting this correctly ensures accurate regeneration timing and prevents resin fouling.
Can I install a Kinetico water filter myself?
Homeowners with plumbing experience can handle many installation steps, including pre-filter replacement and basic setup. However, complex tasks like programming, electronic diagnostics, or unusual water conditions may require an Authorized Independent Kinetico Dealer.
Why should outdoor spigots be bypassed?
Softening outdoor water strains the system unnecessarily and accelerates wear on dechlorination components and resin tanks. Bypassing outdoor fixtures preserves filter life and reduces salt and water usage.
What happens if I use petroleum jelly on the O-ring?
Petroleum jelly damages O-rings and explicitly voids the Kinetico warranty. Only silicone lubricant approved by an authorized dealer should be used on seals.
Key Takeaways for Successful Kinetico Water Filter Installation
Proper Kinetico water filter installation comes down to three essentials: choosing the right location, setting compensated hardness accurately, and following code-compliant drain line practices. Always engage bypass mode before servicing filters, use only silicone lubricant on O-rings, and stick with genuine Kinetico replacement parts to protect your warranty.
For optimal long-term performance, schedule filter replacements every six months, conduct annual visual inspections, and consult an Authorized Independent Kinetico Dealer for complex issues. Start by verifying your installation site meets all clearance, electrical, and drain requirements before connecting any plumbing.