How to Install Reverse Osmosis System
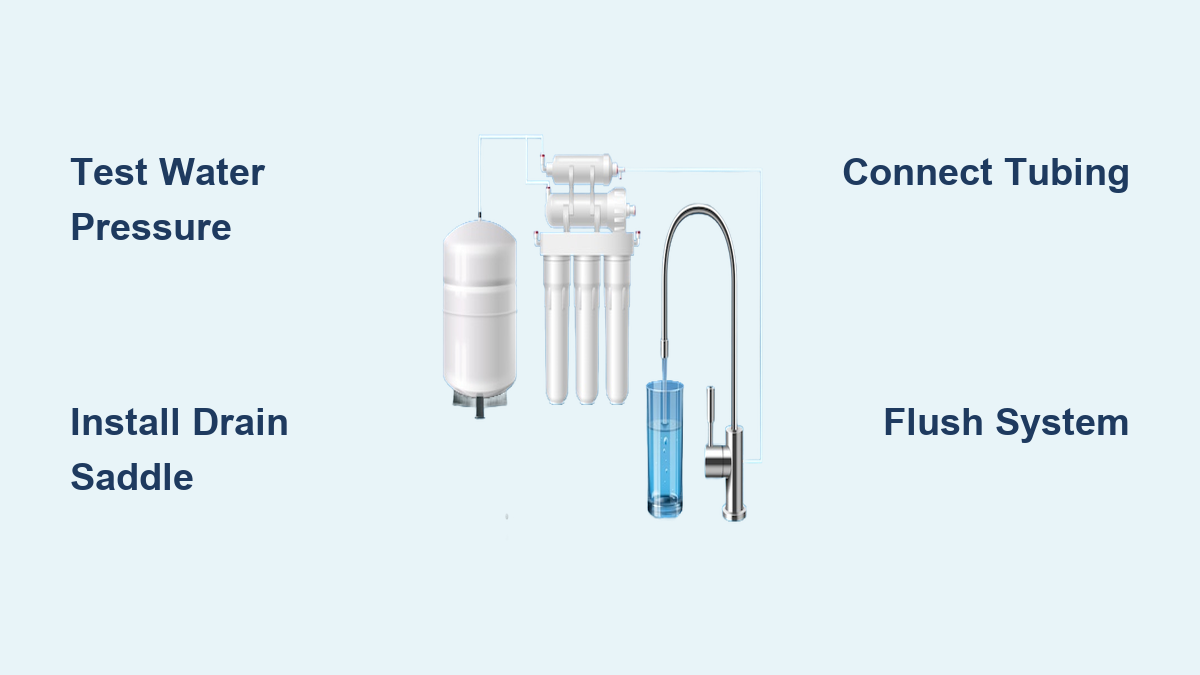
Installing a reverse osmosis system under your kitchen sink is one of the most effective ways to remove contaminants like lead, arsenic, fluoride, and nitrates from your drinking water. A properly installed RO unit delivers crisp, purified water straight from a dedicated faucet while keeping your countertop clutter-free. Most standard under-sink models are built for DIY installation, requiring only basic plumbing skills, common household tools, and about 90 minutes to four hours of your time.
This guide walks you through every phase of the process, from choosing the right location and testing your water pressure to drilling faucet holes, connecting tubing, and flushing the system for first use. You’ll also learn the pretreatment checks that protect your membrane and preserve your warranty.
Pick the Right Installation Location for Your RO System
Under-Sink Placement Basics
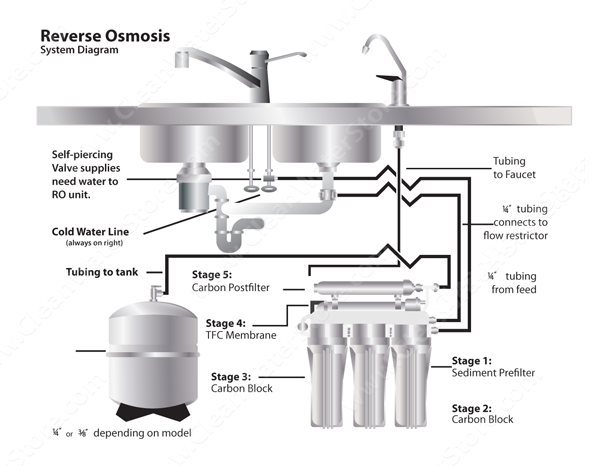
The kitchen sink cabinet is the most common spot for residential reverse osmosis installation. This location gives you direct access to the cold-water supply line, drainpipe, and countertop space for a dedicated faucet. You need enough room for the filter manifold, a 3–5 gallon storage tank, and all tubing without crowding. Always leave clearance below filter housings so you can swap cartridges during routine maintenance. If your cabinet is too tight, consider wall-mounting the unit on the cabinet’s side panel or relocating it to a basement or utility closet.
Alternative Mounting Options
When under-sink space is unavailable, remote installations work well. Mounting the system in a basement or utility area lets you run 1/4-inch PEX or poly tubing through floors or walls to connect supply, drain, and purified water lines. Push-to-connect fittings keep joints leak-free over long distances. For granite or quartz countertops where drilling is risky, look for systems with ClearLink PRO technology, which uses a wireless valve to switch between filtered and unfiltered water through your existing faucet.
Test Water Quality and Pressure Before Installation

Check for Required Pretreatment
Testing your feed water before installing any RO system protects your membrane and keeps your warranty valid. Check for hardness, iron, manganese, chlorine, and pH levels. Hardness above 4 grains per gallon, iron above 0.3 ppm, or manganese above 0.05 ppm will foul the membrane quickly. Chlorine degrades thin-film composite membranes, so carbon pre-filtration is essential. In nearly all cases, some form of pretreatment like a whole-house softener or sediment pre-filter is necessary.
Measure Incoming Water Pressure
RO systems perform best between 50 and 80 psi. Use a Schrader valve gauge (the same type used for bike tires) to check pressure at your sink. If pressure reads below 45 psi, expect slow production and poor efficiency, and plan to install a booster pump. Homes on well systems with a 30/50 pressure switch often fall short during peak use. Pressure above 80 psi may require a pressure-reducing valve to prevent component damage. For whole-house units, keep feed pressure above 30 psi to avoid automatic shutdowns.
Gather Tools and Components for the Job
Essential Tools for Installation
You will need an adjustable wrench, screwdrivers, a pipe cutter, a drill with hole saw bits (7/8-inch to 1-inch), and sandpaper for deburring. A diamond-tip drill bit is required for granite or quartz countertops to prevent cracking. For whole-house systems, add channel locks for large fittings and a voltage tester if electrical work is involved. Keep towels and a bucket nearby to catch residual water after shutting off the supply.
Required Materials and Fittings
Standard kits include filter housings, a membrane, storage tank, faucet, drain saddle, and color-coded tubing. Stock extra supplies like Teflon tape for threaded connections, O-ring lubricant (usually included), and replacement elbows or reducers in case of incompatible fittings. Use PEX tubing for long runs in remote installations. Never use copper for permeate lines; low-pH purified water corrodes soft metals. Stick with CPVC, PVC, or stainless steel instead.
Drill the Faucet Hole and Install the Drain Saddle
Mark and Drill the Faucet Hole
Look for an unused hole in your sink or countertop, such as one left by a removed soap dispenser or side sprayer. If none exists, mark your desired spot on the sink deck. Clamp the area when drilling laminate to prevent chipping. Use a 7/8-inch to 1-inch hole saw for standard faucets, or switch to a diamond core bit for stone surfaces. Drill slowly to avoid overheating. After drilling, use a straw or wire to confirm the hole goes all the way through, then deburr the edges with sandpaper.
Assemble and Secure the Faucet
Insert the faucet from above the sink. From underneath, add components in this order: rubber gasket, plastic washer, metal lock washer, and lock nut. Tighten securely with a wrench, but avoid over-tightening, which can crack the sink or damage seals. If space is tight, attach the blue tubing to the faucet stem before final tightening. Confirm the faucet operates smoothly and swivels freely once installed.
Install the Drain Saddle Properly
Attach the drain saddle to a vertical or horizontal section of the 1.25″ to 1.5″ drainpipe before the P-trap. Avoid placing it near garbage disposals to prevent contamination. Drill a 1/4-inch hole into the pipe, slide the gasket over it, then position the saddle halves around the pipe. Tighten both screws evenly to create a watertight seal. Route the black drain line downward to prevent siphoning, ensuring no kinks or upward loops that could trap air or waste.
Connect the Cold Water Supply Line

Install the Split Adapter Valve
Turn off the main cold water supply under the sink and disconnect the existing riser tube from the shutoff valve. Wrap the threads of your new RO feed adapter (angle stop with side port) with three wraps of Teflon tape, leaving the first thread bare to prevent shavings from entering the line. Hand-start the valve, then tighten with a wrench. Reconnect the original faucet supply line to the bottom port and attach the orange supply tube to the side outlet.
Prevent Leaks at Connections
Make sure both connections are snug but not over-tightened. Turn the water back on slowly and check for drips. A small leak at the adapter usually means insufficient Teflon tape or cross-threading. If leaks persist, disassemble, reapply tape, and reconnect. Never force fittings. Use elbows or reducers instead of bending tubing to reach difficult connections.
Mount Filters and the Storage Tank
Secure the Filter Manifold
Position the filter housing assembly in the cabinet, leaving easy access for future filter changes. If the unit does not stand on its own, anchor it using a toggle bolt through the base. Insert the bolt from below, hold it in place, and tighten the wing nut above. Avoid placing the tank directly on concrete in basements; elevate it on a wood block to prevent condensation and corrosion.
Prepare and Charge the Storage Tank
Check the tank’s air pressure using a Schrader valve gauge. It should read 7–8 psi when empty. If low, use a bike pump to add air until correct. Wrap 4–5 layers of Teflon tape around the tank valve threads before screwing it in by hand, then tighten slightly with a wrench. Over-tightening can crack the plastic tank. Connect the blue or black permeate line from the RO unit to the tank valve using a push-fit connector.
Insert Filters and Connect the Tubing
Load Filters and the RO Membrane
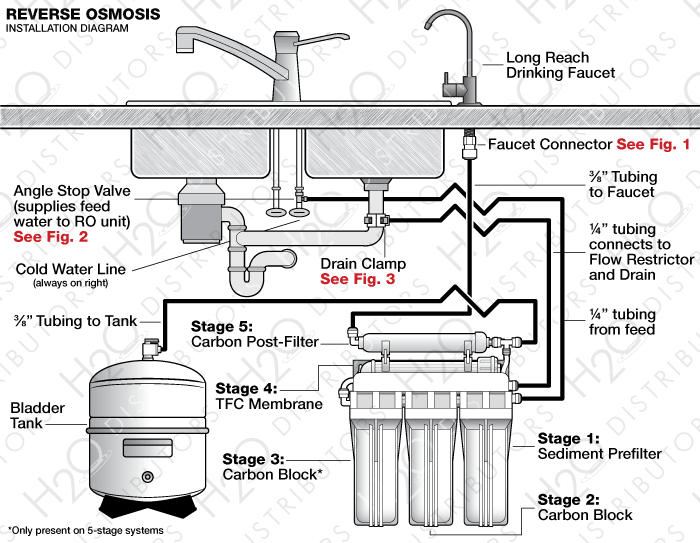
Unscrew each filter housing. Insert the sediment filter first, followed by the two carbon filters (check your manual for the correct order). For the membrane housing, remove the cap, lubricate the O-ring with the provided silicone grease, and insert the RO membrane fully into the slot with the branded side facing out. Reinstall the cap and tighten. Lubricating the O-rings prevents leaks and makes future removal easier.
Route and Connect Color-Coded Tubing
Cut all tubing cleanly with a pipe cutter and remove burrs. Push each end firmly into the corresponding push-to-connect fittings until you hear a click:
– Orange/Red: From adapter valve to RO inlet
– Black: From RO concentrate port to drain saddle
– Blue: From tank to faucet
– Permeate line: From RO membrane to tank valve
Avoid sharp bends or kinks. Use tubing clips to secure lines along cabinet walls. Label lines if color coding differs from standard.
Start Up and Flush the System
Sanitize Before First Use
Remove all filters and the membrane. Add ½ teaspoon of unscented bleach to the empty sediment housing. Reassemble and turn on the water. Let it run for 15 minutes to circulate the sanitizer through all components. Shut off, drain, then flush again with fresh water to remove all bleach residue. Reinstall the filters and membrane.
Check for Leaks and Initial Flow
Open the feed water and tank shutoff valves. Inspect every connection for drips. Listen for hissing, which signals air escaping or pressure building. Let the system run continuously for 30 minutes. Wastewater should flow steadily from the drain line. Initial purified water may appear dark or black due to carbon fines, which is normal.
Cycle the Storage Tank
Let the tank fill completely, which usually takes 2–4 hours. Open the RO faucet and drain all water. Repeat this fill-and-drain process two more times to purge manufacturing residues and condition the bladder. Do not drink the water from the first two tanks.
Verify Performance and Final Checks
Test Water Output and Taste
After full cycling, check the flow rate at the faucet. It should match the system’s GPD (gallons per day) rating under proper pressure. Use a TDS meter to confirm rejection efficiency. Purified water should read significantly lower than tap. Initial taste may be slightly off due to trapped air, but this clears within a day.
Inspect for Common Issues
If production is slow, verify inlet pressure and check for clogged pre-filters. Continuous drain flow suggests a stuck check valve or solenoid. No water could mean a closed valve, frozen membrane, or failed pump. For whole-house units, confirm running pressure is 40–60 psi and membrane pressure does not exceed 150 psi.
Maintain and Troubleshoot Long-Term
Follow the Filter Replacement Schedule
Replace sediment and carbon pre-filters every 6–12 months. Change the post-carbon filter every 12–18 months. The RO membrane lasts 2–3 years with proper pretreatment. Replace the storage tank every 5–7 years or if it fails to hold pressure. Always check tank air pressure during filter changes.
Prevent Warranty-Voiding Mistakes
Failure due to untreated hard water, iron, or chlorine typically voids the membrane warranty. Never apply voltage to dry-contact control wires on whole-house systems. Avoid copper permeate lines; use only plastic or stainless steel to prevent leaching. For UV-equipped systems, replace bulbs annually and clean the quartz sleeve.
Know When to Call a Professional
While most under-sink RO systems are DIY-friendly, granite or quartz drilling, 220V electrical connections, or whole-house installations should be handled by licensed professionals. Complex setups involving booster pumps, re-pressurization systems, or anti-scalant dosing require expert knowledge to avoid safety hazards and system damage.
Frequently Asked Questions About Installing Reverse Osmosis Systems
How long does it take to install a reverse osmosis system?
Most DIY installations take between 90 minutes and 4 hours, depending on whether you need to drill through stone countertops and how accessible your plumbing connections are. Under-sink installations on laminate or stainless steel surfaces typically go faster than remote or whole-house setups.
Do I need a booster pump for my RO system?
You need a booster pump if your incoming water pressure stays below 45 psi consistently or if your system is rated for more than 50 gallons per day. Homes on well systems with a 30/50 pressure switch and high-rise buildings commonly require pumps to achieve adequate production rates.
Can I install an RO system on a granite countertop?
Yes, but you must use a diamond core bit instead of a standard hole saw to prevent cracking. Drill slowly to avoid heat buildup. If you are uncomfortable drilling stone, consider a system with ClearLink PRO technology that uses your existing faucet, or hire a professional for the drilling portion.
Why is the water black when I first turn on my RO system?
The dark color comes from carbon fines, tiny particles of carbon dust released from new filter cartridges during shipping. This is completely normal. Continue flushing the system until the water runs clear, which usually takes 15–30 minutes of continuous operation.
What happens if I skip water pretreatment?
Skipping pretreatment when your water has high hardness, iron, or chlorine will foul the RO membrane quickly, reducing output and shortening its lifespan. Most manufacturers will not honor membrane warranties if failures result from untreated water. A simple sediment and carbon pre-filter protects your investment.
How often should I replace the filters in my RO system?
Replace sediment and carbon pre-filters every 6–12 months, the post-carbon filter every 12–18 months, and the RO membrane every 2–3 years. The storage tank typically lasts 5–7 years. Always verify tank pre-charge pressure (7–8 psi) during filter changes.
Key Takeaways for a Successful Reverse Osmosis Installation
A properly installed reverse osmosis system delivers years of clean, safe drinking water with minimal upkeep. The three most important steps are testing your water pressure and quality before installation, using the correct tubing connections and color coding, and sanitizing the system thoroughly before first use. Skipping pretreatment or rushing the flush cycle are the most common mistakes that lead to membrane failure and warranty disputes.
Your next step is to gather your tools, test your feed water, and set aside a few hours for installation. Always consult your specific model’s manual for variations in tubing color, filter order, or electrical requirements. If your installation involves granite drilling, 220V wiring, or a whole-house system, contact a licensed professional to ensure safety and protect your warranty.