How to Make a Salt Water Purifier

Picture yourself stranded on a coastline surrounded by miles of undrinkable ocean water. Dehydration sets in within hours, but the sea itself holds the solution. You can transform saltwater into safe drinking water using simple principles of evaporation and condensation. The core science behind how to make a salt water purifier relies on distillation, a method that separates pure water vapor from dissolved salts and impurities.
This guide walks you through proven DIY techniques, from a fire-powered stainless steel bottle to solar stills built with household items. You’ll learn which materials work best, how to avoid common mistakes, and how to maximize your freshwater output in any environment.
Build a Stainless Steel Bottle Desalinator
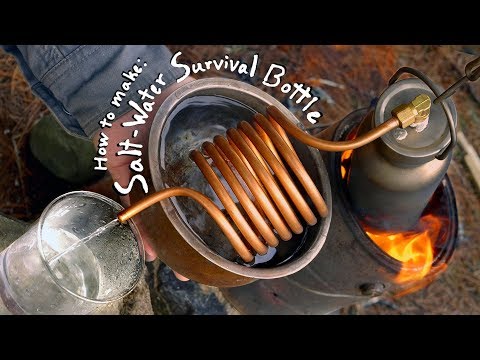
Transform an ordinary stainless steel water bottle into a portable, fire-powered saltwater purifier using copper tubing and basic soldering. This compact system uses thermal distillation, boiling saltwater and condensing the steam into drinkable water.
Gather Required Materials
You need the following items:
– Stainless steel water bottle (non-insulated, with steel lid)
– 1/4-inch lead-free copper tubing (3–4 feet)
– Right-angle compression fitting
– Rubber O-ring or small rubber piece
– Silicone gasket (original to the bottle)
– Soldering iron and torch
– Lead-free plumbing solder
– Flux, sandpaper, rubbing alcohol
Optional upgrades include a Fresnel lens or parabolic mirror for solar heating, plus black paint or soot to boost heat absorption.
Drill and Prepare the Lid
Remove the lid and silicone gasket. Drill a central hole just large enough to fit the copper tube snugly. Then drill a second, smaller vent hole near the edge. This releases pressure during soldering and prevents warping.
Clean both the lid surface and copper tube with sandpaper, then wipe with rubbing alcohol to remove grease. Apply flux generously to ensure a strong solder bond.
Solder the Copper Tube Securely
Hold the copper tube vertically through the main hole. Use a torch to heat the joint evenly, then apply lead-free solder around the rim where the tube meets the lid. The solder should flow smoothly, creating a sealed connection.
For the small vent hole, use a soldering iron for precision. Seal it completely unless you need it temporarily during assembly. Let the joint cool completely before handling.
Reassemble and Form the Condensation Coil
Reinstall the silicone gasket and screw the modified lid back onto the bottle. The copper tube should extend about half an inch inside and outside the bottle.
Wrap the external portion of the tube tightly around the bottle body. Aim for 8–9 full turns to increase surface area for better condensation. Bend the ends outward: one connects to the compression fitting, the other hangs down as the output spout.
Attach Fitting and Test Seal
Insert the coiled end into the right-angle compression fitting. Place a small rubber piece inside the lock nut before tightening. It compresses against the copper tube, forming an airtight seal.
When used as a regular water bottle, keep the rubber in place. To activate as a purifier, remove the rubber so steam can escape into the coil.
Operate Your Bottle Purifier Safely
With construction complete, it’s time to produce freshwater. Follow these steps carefully to avoid damage and ensure safety.
Fill and Heat the Bottle
Pour about 250 mL of saltwater into the bottle. Do not overfill. Suspend it over a heat source using the lid’s built-in ring. Keep the output end of the coil positioned over a clean collection container.
Never let the bottle boil dry. Stop heating when water level drops below the coil entrance to prevent mineral buildup and potential warping.
Choose the Right Heat Source
Effective options include:
– Small alcohol stove (e.g., soup can): Lightweight but wind-sensitive
– Coffee can stove: More stable and efficient
– Campfire: Works but offers poor temperature control
– Solar concentrator: Use a Fresnel lens or mirror focused on a blackened bottle for flameless operation
Painting the bottle black, or letting it blacken naturally in fire, improves heat absorption by up to 40%.
Maximize Condensation Output
Condensation depends on a temperature difference between hot steam and cool coil. Boost efficiency with these techniques:
- Wet cloth wrap: Drape a damp shirt around the coil. Re-wet it every few minutes to maintain cooling.
- Cold water bath: Submerge the lower half of the coil in cold water. This dramatically increases condensation but may briefly stall flow if cooled too quickly.
- Pre-fill the output tip: Once a few drops collect, dip the end into the collected water. The water column acts as a secondary condenser, improving yield.
Expect approximately 175 mL of freshwater from 250 mL of saltwater, a high recovery rate for a small-scale system.
Use Low-Tech Beach Survival Stills
When no tools are available, use debris and sunlight to build emergency purifiers. These methods work with minimal materials and are ideal when stranded.
Build a Trash Bag Still with Tubing
Materials needed:
– Glass bottle (beer or soda)
– Flexible tube (plastic, hose, or bamboo)
– Plastic trash bag or tarp
– Sticks or tripod
– Collection cup
Steps:
1. Fill the bottle halfway with seawater.
2. Insert one end of the tube into the bottle neck. Seal gaps with mud or cloth.
3. Run the other end into a plastic bag.
4. Prop the bag open with sticks to form a dome.
5. Heat the bottle over a fire.
Steam travels through the tube, condenses inside the cooler bag, and drips into the bottom. After about one hour, you’ll collect drinkable water.
Note: If using bamboo tubing, expect a slight plant flavor, but the water is safe.
While plastic leaching is a concern under heat, survival prioritizes hydration over long-term chemical risks.
Construct a Bottle-in-Bottle Solar Still
Use two containers and sunlight to create a passive purifier.
Materials:
– Large plastic bottle (cut in half) or bucket
– Small inner cup or glass bottle
– Plastic wrap
– Small rock
– Tape or cord
Steps:
1. Place the small cup in the center of the large container.
2. Pour saltwater around it. Keep the level below the cup’s rim.
3. Cover tightly with plastic wrap. Seal edges with tape.
4. Place a rock in the center of the wrap, directly above the cup.
5. Set in full sun.
Solar heat evaporates the saltwater. Vapor condenses on the plastic and drips into the central cup. First drops appear in 60–90 minutes.
This method also purifies muddy or algae-filled water. Output is clear and safe.
Pro Tip: Use a dark-colored outer container to absorb more heat and speed up evaporation.
Make a Household Solar Still (No Fire Needed)
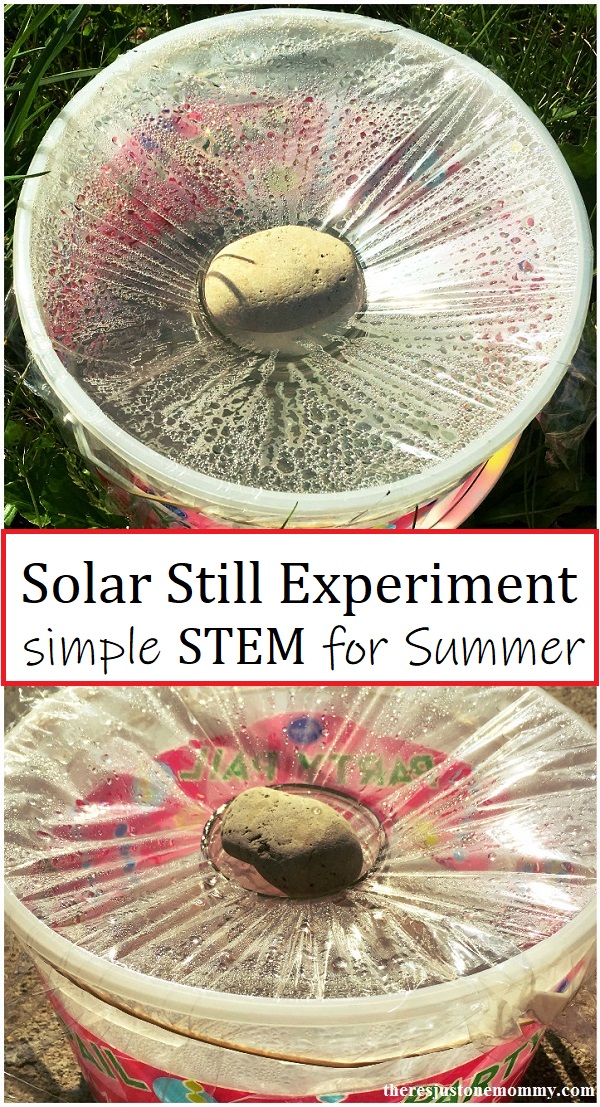
Create a zero-energy purifier using everyday household items. This method is perfect for emergencies when power and fuel are unavailable.
Assemble the Still in 5 Steps
- Choose a Container: Use a clean 2-gallon plastic bucket or large bowl.
- Place Collection Cup: Set a smaller cup in the center. Ensure it’s stable.
- Add Saltwater: Pour seawater or brackish water around the cup. Fill halfway and leave space for vapor.
- Seal with Plastic Wrap: Stretch clear plastic tightly over the top. Seal edges with tape or by folding over the rim.
- Add Weight: Place a small stone on the wrap above the cup to create a dip that directs condensation inward.
Position the entire unit in direct sunlight. A rooftop or sunny patio works best.
Understand How It Works
Sunlight heats the saltwater, turning it into vapor. The vapor rises, hits the cooler plastic cover, and condenses into droplets. Gravity pulls the droplets down the sloped plastic into the central cup.
Output: 1–2 cups per day, depending on sun intensity and container size.
Boost Efficiency:
– Use a dark bucket to absorb more heat
– Increase surface area with a larger lid or sheet
– Reuse the same setup daily with minimal maintenance
This still mimics Earth’s natural water cycle and requires no monitoring once set up.
Why Reverse Osmosis Isn’t DIY-Friendly (But Matters)
While thermal distillation powers most DIY purifiers, reverse osmosis (RO) dominates industrial desalination. Understanding it helps explain why some methods are impractical at home and why commercial systems work so well.
RO Requires High Pressure and Precision
RO forces saltwater through a semi-permeable membrane with pores 0.001 microns wide, small enough to block salt ions. But this requires approximately 800 psi of pressure, far beyond what hand pumps or gravity can achieve.
DIY RO attempts fail because:
– Membranes clog instantly without multi-stage pretreatment
– High-pressure pumps are expensive and complex
– Fouling from algae, bacteria, and TEPs (gel-like particles) destroys membranes quickly
Commercial Watermakers Use RO Smartly
Marine watermakers on boats use DC-powered RO systems with:
– Prefilters (5-micron sediment filters)
– High-pressure plunger pumps
– Anti-scalant dosing
– UV or chlorine post-treatment
They produce gallons per hour but cost thousands and need regular maintenance.
Bottom Line: RO is not feasible for DIY survival builds. Stick with distillation. It’s simpler, safer, and works with accessible materials.
Optimize Yield and Avoid Common Mistakes
Maximize your purifier’s output and lifespan by avoiding these frequent errors.
Never Let It Run Dry
Heating an empty or near-empty still leaves behind concentrated salt and minerals. These bake onto surfaces, creating hard scale that reduces efficiency and damages equipment.
Rule: Stop heating when water level drops below halfway.
Prevent Plastic Leaching in Solar Stills
Using plastic bags or wrap in hot environments risks chemical leaching. While acceptable in emergencies, reduce risk by:
– Using food-grade plastic wrap
– Avoiding colored or printed plastics
– Replacing plastic after prolonged use
Don’t Skip Re-mineralization
Distilled water is pure H₂O but lacks electrolytes. Drinking it exclusively, even for days, can cause electrolyte imbalance, leading to fatigue, cramps, or worse.
Fix: Add only a few drops of leftover brine (the thick salt sludge) to your collected water. This restores trace minerals without making it undrinkable.
Discard the remaining sludge. It’s too concentrated for safe reuse.
Compare Methods: Which One Should You Use?
| Method | Output | Portability | Build Time | Best For |
|---|---|---|---|---|
| Stainless Bottle + Coil | High (for size) | Excellent | 1–2 hours | Hiking, camping, emergency kit |
| Trash Bag Still | Low | Poor | 20 mins | Stranded survival, no tools |
| Bottle-in-Bottle Still | Very Low | Moderate | 15 mins | Static camp, short-term use |
| Household Solar Still | Low | Low | 10 mins | Home emergency, education |
| Commercial RO Watermaker | Very High | Low | N/A | Boats, off-grid living |
Winner for most users: The stainless steel bottle desalinator. It’s compact, durable, and produces the most water per unit of fuel.
Frequently Asked Questions About Salt Water Purification
Can you really drink water from a DIY salt water purifier?
Yes, distillation removes salt and most contaminants by boiling water and collecting the condensed steam. The result is safe, pure water. However, it lacks minerals, so add a few drops of brine to restore electrolytes for long-term use.
How much freshwater can a DIY purifier produce per day?
Output varies by method. A stainless steel bottle desalinator yields about 175 mL per batch. A household solar still produces 1–2 cups daily, depending on sunlight. Trash bag stills collect small amounts over several hours.
Is it safe to use plastic in solar stills?
Plastic wrap and bags can leach chemicals when heated. In survival situations, the risk of dehydration outweighs this concern. For regular use, choose food-grade, uncolored plastic and replace it periodically.
Why doesn’t reverse osmosis work for DIY purifiers?
RO requires approximately 800 psi of pressure to force water through membranes with 0.001-micron pores. Hand pumps and gravity cannot generate this force, and membranes clog quickly without industrial pretreatment systems.
How do you prevent mineral buildup in distillation equipment?
Always stop heating before the water runs dry. Salt and minerals concentrate and bake onto surfaces as water evaporates. Flush copper coils with vinegar periodically to remove any scale that does form.
Can solar stills purify non-saltwater sources too?
Yes. Solar stills effectively remove sediment, algae, and bacteria from murky or contaminated freshwater. The distillation process kills pathogens through boiling and leaves impurities behind.
Key Takeaways for Building Your Own Salt Water Purifier
Learning how to make a salt water purifier equips you with a life-saving skill rooted in real science. The stainless steel bottle desalinator offers the best balance of portability and yield for most users, while solar stills provide a no-fuel backup option. Always remember to re-mineralize distilled water with a few drops of brine to prevent electrolyte depletion during extended use.
Start by building the bottle desalinator for your emergency kit. Practice the process at home so you can execute it confidently under pressure. Clean your equipment after each use and store it dry to ensure reliability when you need it most.