How to Fix KitchenAid Refrigerator Water Dispenser
Is your KitchenAid refrigerator water dispenser not working when you need it most? From a glass that keeps running to no water at all, these problems disrupt daily routines, but most are fixable without a service call. Whether your dispenser drips after use, refuses to start, or shows no signs of power, the right diagnostic approach saves time and money.
This guide walks you through every repair step using verified methods and manufacturer-backed solutions. You will learn how to identify common faults like stuck actuators, failed filter heads, and supply issues, and fix them fast. By the end, you will know exactly what is wrong and how to restore full water functionality to your KitchenAid fridge.
Verify Control Settings First
Before opening panels or replacing parts, rule out simple control-based locks that disable the dispenser without notice.
Disable Control Lock Mode
If the dispenser does not respond but the fridge runs normally, Control Lock may be active. This safety feature disables all touch controls, including water and ice, while keeping cooling and lights operational.
- Look for a lock icon on the display panel.
- To disable, press and hold the Lock button for 3 seconds (exact method varies slightly by model).
- Test the dispenser immediately after unlocking.
✅ Pro Tip: If the lock symbol is visible, this is likely the only issue. No tools or disassembly needed.
Exit Sabbath Mode If Enabled
Sabbath Mode disables dispensing functions to comply with religious observances. It is often activated accidentally.
- Symptoms: No lights, no response to door openings, no water or ice, but temperature settings remain unchanged.
- To exit, hold the Sabbath Mode button for 3 seconds until the indicator turns off.
- Confirm operation by attempting to dispense water.
⚠️ Warning: If the control panel is completely dark except for one button, do not assume electrical failure. Check for Sabbath Mode first.
Check Water Supply and Pressure

Even a perfectly functioning dispenser fails without proper water flow. Start here if water output is slow, sputters, or stops after a few seconds.
Inspect Supply Line for Kinks
A bent or pinched water line is one of the most overlooked causes of poor performance.
- Locate the 1/4″ O.D. copper or PEX tubing connected to the back of the fridge.
- Trace it from the wall valve to the refrigerator inlet.
- Ensure the line is not compressed behind the unit or folded under the cabinet.
✅ Visual Cue: A sharp bend or flattened section in the tube equals restricted flow. Gently straighten it and test.
Confirm Adequate Water Pressure
Low pressure leads to weak dispensing and poor ice production.
- Ideal pressure: 40–120 psi.
- Low-pressure signs: Dribbling water, hollow ice cubes, long refill times.
- If connected to a reverse osmosis (RO) system, pressure may drop below 40 psi. Install a booster pump if necessary.
🔧 Quick Test: Disconnect the line at the fridge and run into a bucket. A strong, steady stream confirms good supply. Weak flow means the issue is external.
Diagnose the Water Filter System
The filter is a frequent culprit in “no water” scenarios, even when newly installed.
Replace Filter Every 6 Months
KitchenAid recommends replacing everydrop® filters every 6 months or when the indicator light turns red.
- Old filters become clogged, restricting flow.
- Some models automatically reduce dispensing speed when the filter is overdue.
✅ Action Step: Replace the filter if it is older than 6 months, even if the light has not activated.
Test Without the Filter
To isolate whether the filter itself is blocking water:
- Remove the filter from its housing.
- Try dispensing water.
- If water flows freely, the filter was the issue.
- Possible causes include improper installation, defective seal, or wrong filter model.
- Reinstall the filter, turning clockwise until it clicks into place.
❌ Common Mistake: Forcing the filter without full rotation prevents proper sealing and stops water flow.
Replace Failed Filter Head
If there is no water and no sound from the valve, even with a known-good filter, the internal filter head may be cracked or clogged.
Symptoms of Filter Head Failure
- No water with or without filter
- No humming or clicking when dispensing
- No leaks (failure is internal)
Replacement Steps
- Turn off water supply and unplug fridge.
- Remove filter and unscrew two retaining clips inside the fridge.
- Lower the filter head assembly into the compartment.
- At the back of the fridge, use two wrenches to disconnect supply and return lines (place towels underneath).
- Pull out old head with attached tubing.
- Transfer O-rings or housing parts to new unit (take photos during removal).
- Route new lines through back panel, reconnect, and secure.
- Reinstall filter head, lock in place, and insert filter.
⚠️ Critical: Do not overtighten water line fittings. Plastic threads can crack.
Fix a Sticking Water Dispenser
When water keeps flowing after removing the glass, the problem is almost always mechanical, not electrical.
Identify the Sticking Actuator Tab
The white plastic actuator tab pushes a black switch to activate water flow. Over time, grime or dryness causes it to stick.
- Failure sign: Water runs continuously after releasing the cup.
- Diagnosis: Press the black switch manually with a screwdriver. If it clicks and stops, the switch works. The tab is sticking.
✅ Success Rate: Lubrication fixes this 95% of the time.
Lubricate the Actuator Mechanism
Tools Needed
- Flat-blade screwdriver
- Synthetic food-safe grease (e.g., Permatek Ultra Slick)
Repair Steps
- Shut off water supply.
- Disable cooling by holding both control buttons for 3 seconds (light stays on).
- Drain residual water by pressing the dispenser until flow stops.
- Remove front bezel by inserting a screwdriver into the slot under the dispenser panel and gently prying upward to release clips.
- Expose actuator tab and clean any grime from the slot and moving surfaces.
- Apply a small amount of synthetic grease to the tab’s sides and contact points. Avoid petroleum-based lubes.
- Reinstall bezel, ensuring wires are not pinched.
- Restore water and power, then test.
✅ Test Result: Water should stop instantly when cup is removed.
Replace the Dispenser Actuator Paddle
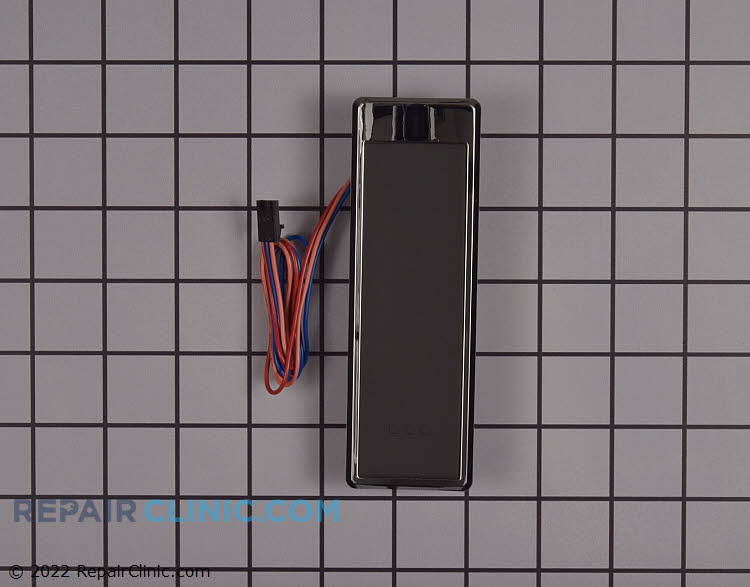
If lubrication fails or the paddle is cracked, replacement is required.
Required Parts and Tools
- Part # WPW10346924 (universal for many KitchenAid, Whirlpool, Maytag models)
- Quarter-inch nut driver
- Two thin putty knives
- Painter’s tape
- Synthetic grease
Step-by-Step Replacement
- Prepare and Remove Interface: Unplug refrigerator. Apply painter’s tape to door edges to prevent scratches. Insert putty knives into left and bottom edges of dispenser face. Gently pry upward to release clips.
- Disconnect Wiring: Locate five wire connectors on actuator panel. Remove retaining clips and disconnect each carefully.
- Remove Dispenser Tray and Housing: Lift out dispenser strainer. Use putty knife to remove tray insert. Remove two quarter-inch screws securing tray to housing. Unscrew two upper screws on actuator housing.
- Swap the Paddle: Peel back tape on housing to access wires. Push old paddle from rear while lifting. Feed new paddle’s connector through housing hole until it snaps securely.
- Reassemble and Test: Feed wires through separator. Slide housing up and reinstall upper screws. Reconnect all five wires and secure clips. Snap interface panel back into place.
✅ Final Check: Paddle should engage firmly and stop water immediately.
Troubleshoot No Power to Dispenser
If the dispenser light is off and no functions work, the issue may be deeper than a simple part failure.
Check Door Wire Harness (Older Models)
On pre-2005 models like KSCS25FKSS00, the freezer door wire harness can break due to repeated flexing at the lower hinge.
Diagnosis
- No power to dispenser or control panel
- Interior lights do not turn on with door open
- Fridge still cools (power to compressor is intact)
Why Repair Is Not Viable
- Door is foam-injected, so wires are sealed inside insulation.
- Harness cannot be accessed without destroying the door.
- Replacement doors cost around $500 and are often discontinued.
🛑 Reality Check: For this failure, unit replacement is the only practical solution.
Prevent Future Problems
Regular maintenance prevents 80% of dispenser failures.
Follow Maintenance Schedule
| Component | Frequency | Action |
|---|---|---|
| Water Filter | Every 6 months | Replace with genuine everydrop® |
| Actuator Tab | As needed | Clean and re-lube annually |
| Supply Line | Annually | Check for kinks, leaks, corrosion |
| Dispenser Area | Weekly | Wipe down to prevent residue buildup |
Use Genuine Parts
- everydrop® filters are engineered to match flow rates and contaminant reduction.
- Aftermarket filters may restrict flow or fail prematurely.
- OEM actuators and filter heads ensure proper fit and longevity.
Avoid Common Mistakes
- Do not overtighten water line fittings. Use hand-tight plus 1/4 turn.
- Do not use silicone or WD-40 on plastic actuators. Use only food-safe synthetic grease.
- Do not skip draining water before disassembly. Floods happen fast.
Frequently Asked Questions About KitchenAid Refrigerator Water Dispenser Repair
Why is my KitchenAid water dispenser not working but the ice maker is fine?
If ice production works normally, your water supply line and pressure are adequate. The issue is likely isolated to the dispenser mechanism itself. Check Control Lock or Sabbath Mode first, then inspect the actuator tab for sticking or damage.
How do I fix a KitchenAid water dispenser that keeps running?
A continuously running dispenser almost always points to a sticking actuator tab. The white plastic tab fails to retract from the black switch, keeping the valve open. Cleaning and applying synthetic food-safe grease resolves this issue 95% of the time.
What causes no water after replacing the filter?
An improperly installed filter is the most common cause. Remove the filter and try dispensing. If water flows without it, the filter was not seated correctly. Reinstall it, turning clockwise until it clicks into place. A failed filter head can also cause this symptom.
How often should I replace my KitchenAid refrigerator water filter?
KitchenAid recommends replacing everydrop® filters every 6 months or when the indicator light activates. Replace sooner if you notice reduced flow, poor-tasting water, or if your area has hard water or sediment issues.
Can I use synthetic grease on my water dispenser paddle?
Yes, but only food-safe, non-drying synthetic grease like Permatek Ultra Slick. Petroleum-based products and silicone sprays can degrade plastic components over time. Apply a thin layer only to the moving surfaces of the actuator tab.
Is it worth repairing an older KitchenAid refrigerator’s dispenser?
For most issues, yes. Repairs like lubrication or filter head replacement cost under $50 and take less than an hour. However, if your model has a foam-injected door with a broken wire harness (common in pre-2005 units), replacement parts are often unavailable, making unit replacement the only practical option.
Final Takeaways for KitchenAid Refrigerator Water Dispenser Repair
Most KitchenAid refrigerator water dispenser problems are quick, low-cost fixes. A stuck actuator tab is a ten-minute lube job. No water with a new filter means checking installation or replacing the filter head. Continuous flow almost always traces back to a dry or grimy paddle mechanism. Only in rare cases, like failed internal wiring in foam-injected doors, does replacement become necessary.
By following this guide, you now have the knowledge to diagnose and repair every common issue, saving time and money. Keep your filter fresh, your actuator lubricated, and your supply line straight, and your KitchenAid will keep delivering clean, cold water for years.