How to Purify RV Water Tank
If your RV water tastes stale, smells like sulfur, or you just pulled the rig out of winter storage, your freshwater tank needs purification. Stagnant water breeds bacteria, mold, and biofilm—slimy colonies that cling to tank walls and plumbing lines. Even crystal-clear water can hide harmful pathogens. City water contains chlorine, but nowhere near enough to disinfect an entire RV system. That is why a targeted purification process is essential for safe drinking water and a healthy plumbing setup.
The goal of purifying your RV water tank goes beyond killing bacteria. You need to circulate a sanitizing solution through every inch of the system, then flush it out completely. Whether you choose bleach, a bleach-free sanitizer, or vinegar for descaling, the method matters. Done wrong, you risk damaging seals, leaving toxic residue, or missing hidden contamination. Done right, you restore clean, safe water in under a day. This guide walks you through every step, from calculating the correct dosage to final flushing, with expert tips to avoid common mistakes.
Calculate Your Tank Volume Before Adding Anything

Include Water Heater Capacity in Your Math
Most RVers only consider their freshwater tank size, but the water heater adds volume—typically 6 gallons for tanked models. If you skip this, you under-dose the sanitizer and reduce effectiveness. For example, a 30-gallon freshwater tank plus a 6-gallon water heater means treating 36 gallons total.
Check your owner’s manual or manufacturer specs. Standard tanked heaters (Suburban, Atwood) usually hold 6 gallons. Tankless models like Girard have no storage, so add 0 gallons.
Use the Ounce-Per-Gallon Formula for Bleach
For bleach sanitization, the gold standard is 50 parts per million (PPM). To hit that target, use this simple math: ounces of bleach equals total gallons multiplied by 0.13.
A 36-gallon system needs about 4.68 oz of bleach, roughly half a cup plus one tablespoon. This matches the common rule of one cup per 50 gallons. Never exceed 50 PPM—stronger solutions damage rubber seals and PEX tubing.
Adjust Dosage for Bleach-Free Sanitizers
Products like AR3 use pre-measured packets, typically 0.5 oz each. Dosage depends on system size. A 15-gallon system needs one packet, while a 75-gallon system needs four packets. Always follow the product label. Many bleach-free options can run through filtration systems if the carbon stage is removed.
Choose the Right Sanitizer for Your System
Use Unscented Bleach for Deep Cleaning
Plain, unscented household bleach (5–6% sodium hypochlorite) is effective and affordable. It kills bacteria, viruses, and mold. However, bleach is corrosive—especially to rubber gaskets, O-rings, and water heater linings. Reserve it for situations like post-storage contamination or annual deep cleans.
Never mix bleach with vinegar or ammonia. The reaction creates toxic chlorine gas. If you plan to use vinegar later, do it as a separate step after complete flushing.
Try Bleach-Free Options for Safer, Faster Results
NSF-certified sanitizers, often hydrogen peroxide-based, are gentler on plumbing and safer to handle. They require no protective gear, leave no taste, and work in as little as 15 minutes. Some foam to lift biofilm from tank walls.
These products work best for frequent sanitization, systems with sensitive filters, and anyone avoiding harsh chemicals. The trade-off is higher cost compared to bleach.
Reserve Vinegar for Descaling Only
White vinegar removes mineral buildup and light bacteria, but only when heated to 130°F. At room temperature, it does not kill most pathogens effectively. Use it after bleach sanitization if you have hard water or visible scale.
Vinegar can corrode magnesium anode rods in water heaters. Replace the rod with an aluminum/zinc alloy afterward to prevent future damage.
Prepare the System Before Sanitizing
Bypass the Water Heater
During bleach sanitization, always bypass the water heater. Concentrated bleach damages the tank lining and anode rod. Plus, bleach sitting in the heater is difficult to flush out.
For Nautilus panels, turn the red knob left. For standard systems, close the inlet and outlet valves and open the bypass valve. Bleach-free sanitizers may allow flow-through—consult your manual.
Remove or Bypass All Filters
Carbon filters and RO membranes must be removed before using bleach. The chemical destroys the filter media, rendering them useless. Reinstall only after full flushing.
For bleach-free options, check compatibility. Some systems let you run sanitizer through if the carbon stage is removed.
Drain All Tanks Completely
Start with empty tanks to prevent dilution. Open low-point drains, remove the water heater drain plug, and empty both gray and black tanks. This ensures the sanitizing solution stays at full strength and old water does not contaminate the new batch.
Add and Circulate the Sanitizing Solution
Dilute Bleach Before Pouring It In
Never pour undiluted bleach directly into the tank—it can degrade seals on contact. Instead, mix the measured bleach in a one-gallon jug filled about 80% with water, then pour the mixture into the freshwater tank through a funnel.
An alternative method: pour bleach into the fill hose while connecting to city water. The flow dilutes it naturally as the tank fills.
Run Water Through Every Outlet
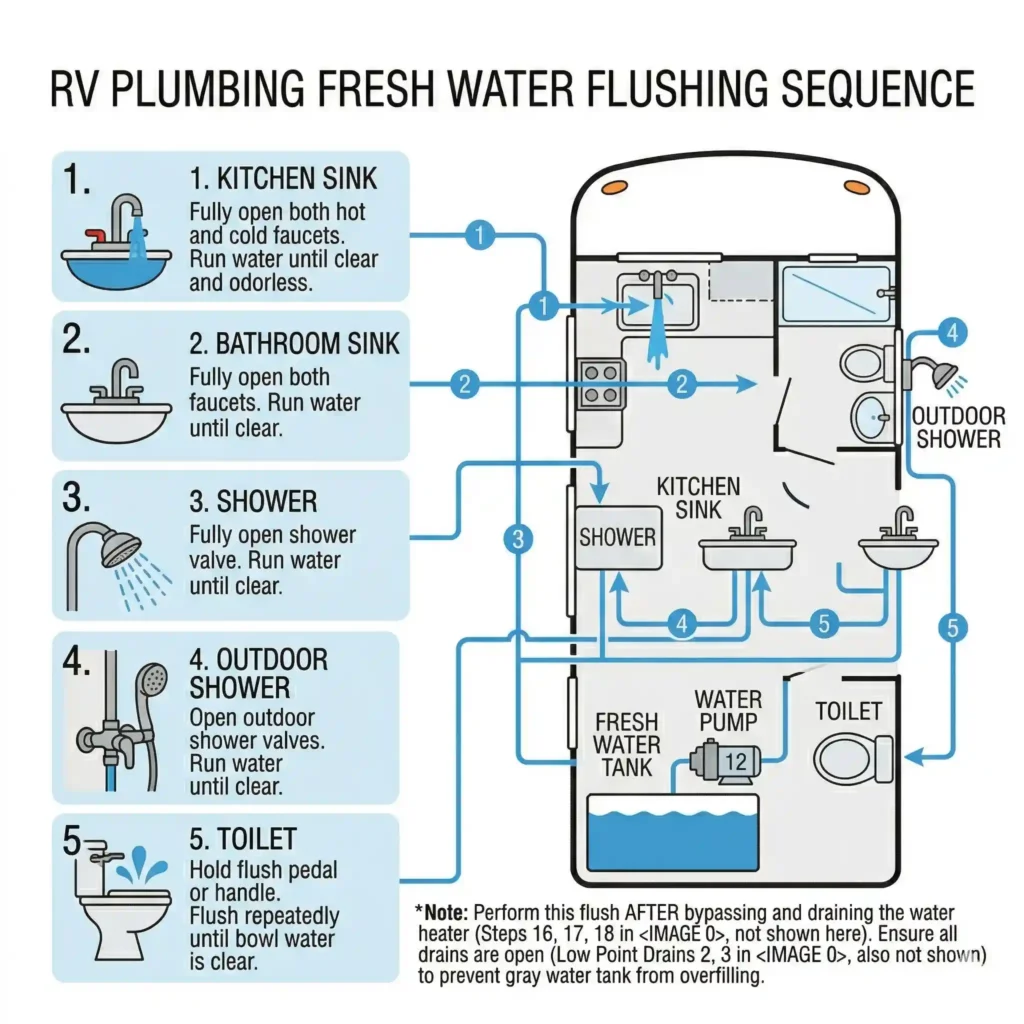
After filling the tank with clean water, turn on the pump and open every faucet. Cover the kitchen, bathroom, shower, and outdoor spigot. Run both hot and cold sides until you smell bleach at each outlet—usually two to three minutes. Flush the toilet once to sanitize the bowl and line.
Expect a delay on hot water lines since they are longer and may still hold old water.
Use Recirculation for Better Tank Coverage
For better contact with tank walls, try the recirculation method. Connect a hose from a faucet back to the freshwater fill, open both hot and cold taps, and let water run back into the tank for five to ten minutes. This splashes the solution onto upper surfaces where biofilm hides.
Let the Solution Sit for Proper Dwell Time
Wait 4 to 12 Hours
After circulation, close all faucets and let the solution dwell. Time is critical for killing microbes.
The minimum dwell time is four hours. The ideal duration is 12 hours, or overnight. Do not exceed 12 hours—prolonged bleach exposure damages seals. If you double the bleach dose, dwell time can drop to one hour, though this is not recommended for routine use.
Agitate the Tank for Better Results
Drive the RV for 10 to 15 minutes to slosh the solution around. This helps dislodge biofilm from the tank’s top and corners where it tends to accumulate.
Flush the System Completely
Drain and Refill Multiple Times
One flush is never enough. Connect to a city sewer—never dump on the ground. Open low-point drains and faucets to drain all chlorinated water. Refill the tank with fresh city water and run all faucets until the bleach smell disappears.
Repeat if needed. Most systems require two to three full flushes.
Neutralize Lingering Chlorine Taste
If water still tastes or smells like chlorine after multiple flushes, mix one quart of white vinegar with five gallons of water. Add it to the tank, circulate, and flush again. Vinegar neutralizes chlorine without harming plumbing.
Restore the System Safely
After the final flush, refill the water heater by turning off the bypass valve and letting it fill completely. Reinstall carbon filters. Turn on the water heater only after confirming it is full—dry firing destroys the heating element instantly.
Test water at each outlet for clarity and odor before using the system.
Fix Common Post-Cleaning Issues

Eliminate Rotten Egg Smell
If water smells like sulfur after sanitizing, anaerobic bacteria in the water heater are reacting with a magnesium anode rod. Sanitize again with bleach and replace the magnesium rod with an aluminum/zinc alloy. This rod resists bacterial reaction and prevents odor long-term.
Clear Cloudy or Smelly Water
Cloudy water that clears from the bottom up in a glass is just air bubbles—harmless. If sediment remains, replace your sediment filter. Persistent bleach taste means the carbon filter is saturated—replace it and run a vinegar rinse.
Prevent Low Water Pressure
Clogged filters or scale buildup reduce pressure after sanitizing. Replace pre-filters, use a vinegar flush every six months if you have hard water, and install an inline sediment and carbon filter on your city water hose.
Maintain a Clean System Year-Round
Sanitize on a Regular Schedule
Full-time RVers should sanitize every six months. Occasional users should do it once a year. Sanitization is mandatory after any storage period exceeding three months and immediately after filling from a questionable water source.
Pair sanitization with filter changes every three to four months for high-use filters.
Protect the System with External Filtration
Use a high-quality external water filter when hooked to city water. A dual-stage unit with sediment and carbon stages reduces contaminants and extends the time between tank cleanings.
Inspect the Anode Rod Annually
In tanked water heaters, the anode rod sacrifices itself to prevent corrosion. Inspect it yearly and replace if more than 50% corroded. Switching to an aluminum/zinc rod also stops sulfur smells before they start.
Frequently Asked Questions About RV Water Tank Purification
How often should I purify my RV water tank?
Purify your tank at least once a year. Full-time RVers should sanitize every six months. Always sanitize after storage periods longer than three months or after filling from a questionable water source.
Can I use regular household bleach to purify my RV water tank?
Yes, but only plain, unscented household bleach with 5–6% sodium hypochlorite. Never use scented, splash-less, or bleach alternatives with additives. Use the formula of 0.13 oz of bleach per gallon of total system capacity to hit 50 PPM.
How long does the bleach need to sit in the RV water tank?
Let the bleach solution sit for a minimum of four hours. Twelve hours (overnight) is ideal for maximum effectiveness. Do not exceed 12 hours, as prolonged exposure damages rubber seals and PEX tubing.
Is vinegar effective for purifying an RV water tank?
Vinegar only works as a sanitizer when heated to 130°F. At room temperature, it primarily removes mineral buildup and scale. For bacterial contamination, bleach or an NSF-certified sanitizer is more effective.
Why does my RV water smell like rotten eggs after sanitizing?
Sulfur smells come from anaerobic bacteria in the water heater reacting with a magnesium anode rod. Sanitize again with bleach and replace the magnesium rod with an aluminum/zinc alloy to eliminate the odor permanently.
Do I need to remove my water filter before sanitizing?
Yes. Remove carbon filters and RO membranes before using bleach—the chemical destroys the filter media. Reinstall filters only after complete flushing. Some bleach-free sanitizers can run through filtration systems if the carbon stage is removed.
Key Takeaways for Purifying Your RV Water Tank Safely
Purifying your RV water tank is non-negotiable for safe drinking water on the road. The process comes down to three essentials: calculate the correct dosage based on your total system volume, circulate the sanitizing solution through every faucet and line, and flush thoroughly until all chemical residue is gone.
Always bypass the water heater and remove carbon filters before using bleach. Respect dwell times—four hours minimum, twelve hours maximum. When in doubt, use an NSF-certified bleach-free sanitizer for a faster, gentler clean.
Your next step: check your owner’s manual for your exact freshwater tank and water heater capacity, then schedule your next purification based on your usage patterns. With the right routine, your RV’s water will stay fresh, safe, and great-tasting for every adventure ahead.