Purify Water in Survival Situations: Quick Steps

You’re dehydrated, exhausted, and a stream is right in front of you. It looks perfectly safe. But drinking untreated water in a survival situation can cause violent illness or worse. Knowing how to purify water is one of the most critical survival skills you can learn. Even crystal-clear mountain streams can carry parasites like Giardia or Cryptosporidium, which trigger weeks of gastrointestinal distress.
The good news is that you don’t need expensive gear to make water safe. With fire, sunlight, household bleach, or layered sand and charcoal, you can purify almost any water source. This guide covers every proven method, ranked by reliability, speed, and accessibility, so you can act fast and stay alive.
Choose the Safest Water Source
Prioritize Moving and Elevated Water
Your first step isn’t purification. It’s source selection. The cleaner the source, the easier it is to treat. Always favor flowing water like streams or rivers over stagnant ponds. Moving water is less likely to harbor breeding bacteria. High-elevation sources like springs, meltwater, or rocky runoff are typically less contaminated than lowland water near human or animal activity.
Avoid High-Risk Contamination Zones
Stay clear of water near livestock, human settlements, beaver or raccoon habitats, agricultural runoff, and visible algae blooms. If the water smells foul, looks cloudy, or has scum on the surface, treat it as high-risk.
Tap the Best Natural Sources
Some sources are inherently safer than others. Rainwater collected mid-air or off clean leaves is nearly pure. Dew can be wiped from non-poisonous plants with a cloth and wrung into a container. Tree sap from maple or birch in late winter provides drinkable fluid. Groundwater seepage can be accessed by digging a “coyote well” near a dry creek bed. Snow and ice should be melted before treatment to avoid wasting fuel.
Pro Tip: When collecting, dip your container just below the surface to avoid floating debris and biofilm.
Boil Water for Guaranteed Safety

Use Rolling Boil Standards
Boiling is the gold standard for water purification. It kills 100% of bacteria, viruses, and protozoa when done correctly. No filters or chemicals required, just heat.
Boiling Times:
– Below 6,500 ft (2,000 m): 1 minute rolling boil
– Above 6,500 ft: 3 minutes due to lower boiling point
A rolling boil means large, continuous bubbles, not just steam. Some experts recommend 5 to 10 minutes for maximum safety in uncertain conditions.
Pre-Filter Before Boiling
Boiling dirty water doesn’t remove sediment or chemicals. Always pre-filter murky water through cloth, moss, or a DIY sand and charcoal filter. This improves taste and ensures pathogens aren’t shielded by debris.
Try Stone Boiling Without a Metal Pot
No container? Use stone boiling:
1. Heat dense, dry stones in fire for 30 minutes.
2. Retrieve with sticks or tongs.
3. Drop into water held in a bark, hide, or wooden container.
4. Add more stones until boiling begins.
Warning: Never use quartz or river rocks. They can explode from trapped moisture. Use dry, igneous stones only.
Use Chemical Treatments Correctly
Chlorine Dioxide: Most Reliable Tablet
Chlorine dioxide tablets like Katadyn Micropur are over 99% effective against all major pathogens, including Cryptosporidium. They’re safe for long-term use and leave minimal taste.
- Dose: 1 tablet per liter or quart
- Wait Time: 4 hours for full effect
- Shelf Life: 2+ years
Ideal for extended trips where boiling isn’t practical.
Iodine: Fast but With Limits
Iodine (e.g., Potable Aqua) works in 35 minutes and kills most bacteria and viruses.
- Dose: 5 to 10 drops per quart (more for cloudy water)
- Wait Time: 30 minutes
- Shelf Life: About 1 year
Avoid if you are pregnant, have thyroid issues, or have an iodine allergy. Iodine doesn’t reliably kill Cryptosporidium and shouldn’t be used long-term.
Household Bleach: Emergency-Only Option
In a crisis, unscented bleach (5.25% sodium hypochlorite) can disinfect water.
- Clear water: 2 drops per gallon (1 drop per quart)
- Cloudy water: 4 drops per gallon
- Wait Time: 30 minutes (60 if cold or cloudy)
Check: Water should smell faintly of chlorine. If not, repeat the dose and wait again. Never use scented, color-safe, or pool bleach.
Build a DIY Water Filter
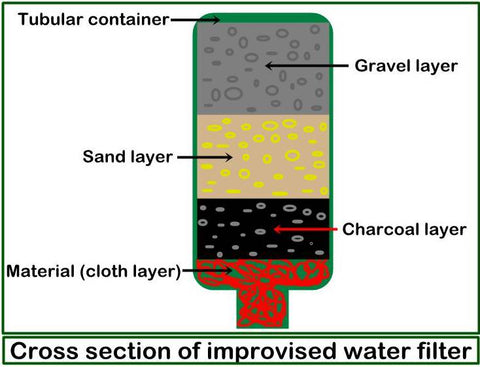
Layered Sand and Charcoal Filter
A makeshift filter removes sediment and improves water clarity, but not viruses. Always follow with boiling or chemicals.
Materials:
– Plastic bottle (cut bottom off) or bamboo tube
– Moss, cloth, or grass (plug)
– Gravel, coarse sand, fine sand, activated charcoal (crushed burned wood)
Layer Order (Top to Bottom):
1. Gravel (traps large debris)
2. Coarse sand
3. Fine sand
4. Crushed charcoal (removes organics, improves taste)
5. Final cloth layer (holds media)
Pour water slowly, collect the output, and repeat if needed. Always boil or chemically treat the result afterward.
Cloth and Conifer Wood Filters
- Cloth filter: Use a T-shirt or bandana to strain sediment before treatment.
- Pine sapwood filter: A 1-inch cube of pine can filter E. coli by 99.9%. Attach to tubing and let water pass through. This method is slow and doesn’t stop viruses.
Use Sunlight to Purify Water
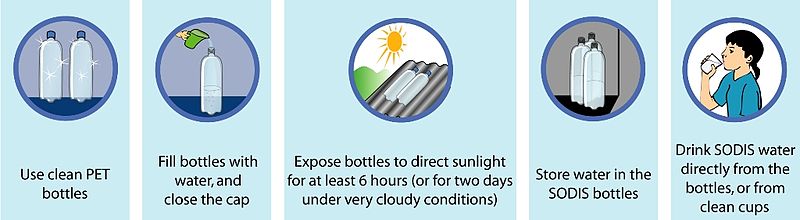
SODIS: Solar Disinfection Method
SODIS uses UV-A rays and heat to kill microbes. It’s free and effective if conditions are right.
Requirements:
– Clear PET plastic or glass bottles (no colored or dark bottles)
– Pre-filtered, clear water
– Full sunlight
Procedure:
1. Fill bottle ¾ full, shake for 20 seconds (adds oxygen), then top off.
2. Place on a reflective surface like foil or metal.
3. Sun exposure: 6 hours full sun, or 2 days if cloudy.
Limitations: Doesn’t work on cloudy water, removes no chemicals, and produces small volumes.
Distill Water from Any Source

Build a Solar Still
Distillation removes everything: salts, heavy metals, viruses, and even urine toxins. It’s your best bet in extreme survival.
How to Build:
1. Dig a 3-foot hole in damp, sunny soil.
2. Place a clean container in the center.
3. Add green plants or urine around (not in) the container.
4. Cover with clear plastic sheet.
5. Seal edges with dirt or rocks.
6. Place a small rock in the center to create a cone drip.
How It Works: Sun heats the ground, moisture evaporates, condenses on plastic, and drips into the container.
Yield: ½ to 1 quart per day. Slow but life-saving for seawater or heavily contaminated sources.
Try Transpiration Bags
Tie a clear plastic bag around a leafy branch. As the plant transpires, moisture collects inside. Harvest in 2 to 4 hours.
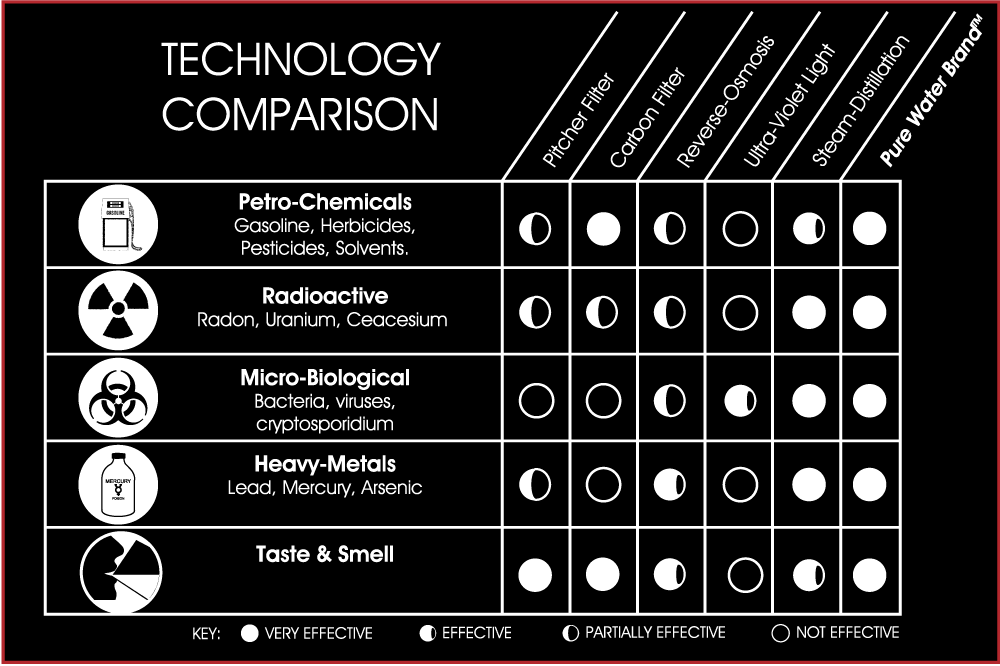
Know What Each Method Removes
| Method | Kills Pathogens | Removes Sediment | Removes Chemicals | Speed |
|---|---|---|---|---|
| Boiling | Yes | No | No | Fast |
| Chlorine Dioxide | Yes | No | No | 4 hours |
| Iodine | Yes (not Crypto) | No | No | 35 min |
| Bleach | Yes | No | No | 30–60 min |
| DIY Filter | Partial | Yes | Partial | Medium |
| UV Purifier | Yes | No | No | Seconds |
| SODIS | Yes | No | No | 6+ hours |
| Distillation | Yes | Yes | Yes | Very Slow |
| Coyote Well | Partial | Yes | Partial | Slow |
Key: No single method does it all. Combine techniques for maximum safety.
Follow a Multi-Step Purification Plan
1. Source and Pre-Filter
Start with the cleanest water available. Filter through cloth or sand to remove debris.
2. Apply Primary Disinfection
Choose one:
– Boil 1–3 minutes (best option)
– Chemical treatment (tablets or bleach)
– UV light (if water is clear)
3. Improve Taste and Safety
- Aerate by pouring between containers to reduce flatness.
- Add a pinch of salt or use activated charcoal to remove chemical taste.
- Store in clean, sealed containers to prevent recontamination.
Pack a Redundant Survival Kit
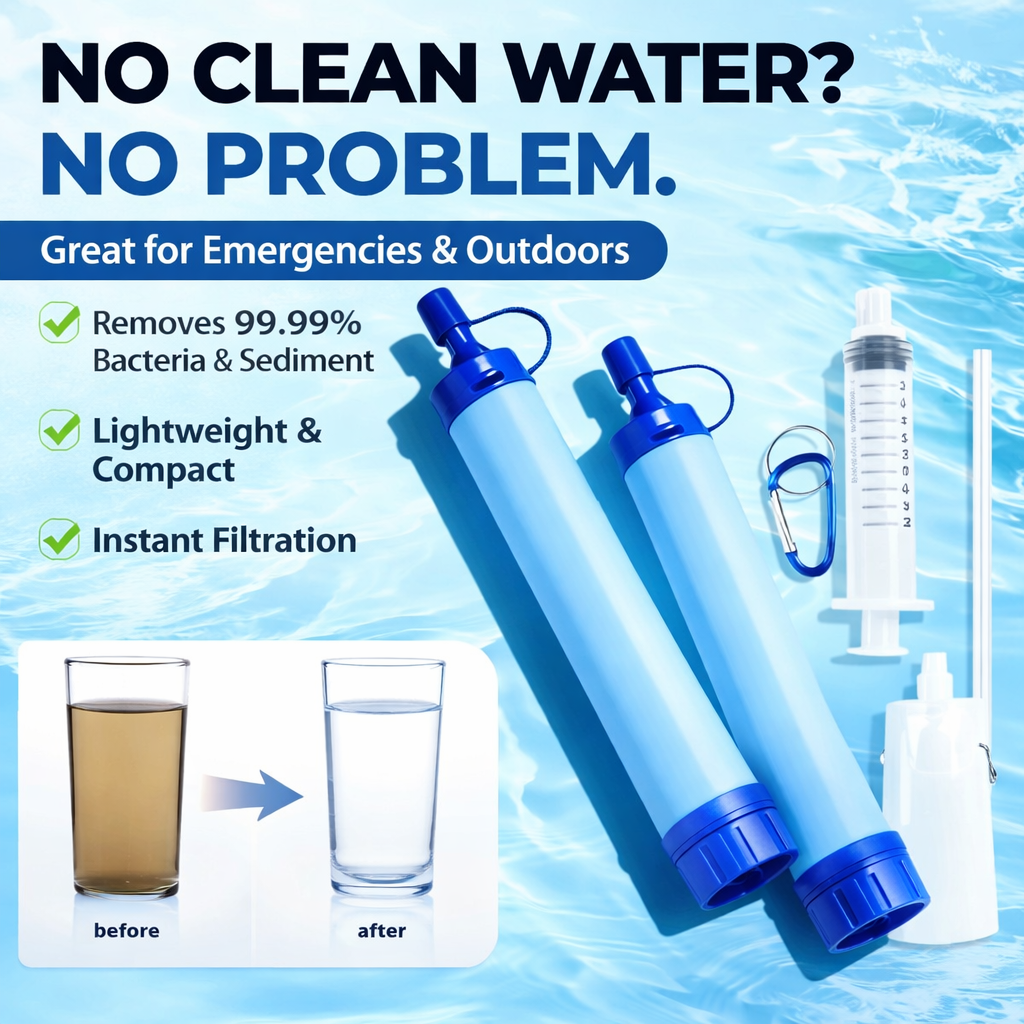
Essential Items to Carry
- Metal bottle or pot (for boiling)
- Chlorine dioxide tablets (long shelf life)
- Compact filter (straw or pump-style, NSF 53/58 rated)
- Lighter or ferro rod (fire-starting)
- Duct tape and paracord (for repairs)
- Clear plastic bags (for stills or SODIS)
Rule of Redundancy: If your filter breaks, you need chemicals. If you run out of tablets, you need fire.
Maintain and Troubleshoot Your Systems
Clean and Replace Filters
- Ceramic filters: Scrub surface with a brush to restore flow.
- Carbon filters: Replace every few months or when taste worsens.
- Clogged straw? Backflush with clean water or blow air through.
Check Chemical Expiry
- Iodine: Loses potency after about 1 year.
- Chlorine dioxide: Stable for 2+ years if sealed.
Test bleach: If it doesn’t smell strong, it’s likely inactive.
Fix Cloudy Water Issues
If water stays murky:
1. Let it sit overnight for sedimentation.
2. Siphon off the middle layer.
3. Re-filter through finer media.
4. Double the chemical dose if treating.
Final Safety Rules
Never Drink Untreated Water
Even if it looks pure. Giardia can lurk in the clearest mountain stream.
Always Carry a Backup Method
Filters fail. Tablets expire. Fire needs fuel. Redundancy saves lives.
Monitor for Illness
If you develop diarrhea, cramps, or vomiting after drinking, seek medical help. Mention possible exposure to untreated water.
When in Doubt, Boil It
No method is more reliable than heat. If you can make a fire, you can make safe water.
Frequently Asked Questions About Water Purification
What is the fastest way to purify water in an emergency?
Boiling is the fastest and most reliable method. Bring water to a rolling boil for 1 minute (or 3 minutes above 6,500 feet). If you can’t boil, chemical tablets like chlorine dioxide work in 4 hours, while iodine works in about 35 minutes.
Can you purify water with just sunlight?
Yes, through a method called SODIS (Solar Water Disinfection). Fill a clear plastic bottle with pre-filtered water and place it in direct sunlight for 6 hours (or 2 days if cloudy). The UV-A rays and heat kill most pathogens.
Does a DIY sand and charcoal filter make water safe to drink?
Not on its own. A homemade filter removes sediment and some bacteria, but it does not reliably remove viruses. Always boil or chemically treat the water after filtering.
How much bleach do you use to purify water for drinking?
Use unscented household bleach with 5.25% sodium hypochlorite. Add 2 drops per gallon for clear water, or 4 drops per gallon for cloudy water. Wait 30 minutes (60 if cold or cloudy). The water should smell faintly of chlorine.
Is rainwater safe to drink without purification?
Fresh rainwater collected mid-air or off clean surfaces is generally safe, but should still be treated when possible. Rain that has passed through tree canopies or touched contaminated surfaces can pick up pathogens.
What is the best water source in a survival situation?
Flowing water from high-elevation streams or springs is usually the safest natural source. Avoid stagnant water, areas near livestock or human settlements, and water with visible algae or chemical contamination.
Key Takeaways for Purifying Water in Survival Situations
In any survival scenario, how to purify water is non-negotiable for long-term survival. Start by selecting the cleanest source available, then pre-filter to remove sediment. Apply a proven kill step like boiling, chemical treatment, or UV light. Combine methods when possible to address different threats like bacteria, viruses, and chemical contaminants.
Build redundancy into your kit. Carry at least two purification methods so a single failure won’t leave you without safe water. Practice these techniques before you need them, because in a real emergency, stress and time pressure make mistakes more likely.
Your next step: assemble a basic survival water kit today. Include a metal pot, chlorine dioxide tablets, a compact filter, and a fire-starter. Store it in your go-bag so you’re always ready.